


Windows Phone Developer Tools Betaの公開
はじめの前にWindow Phone 7に関する新情報です。RC版のリリースが目前の7月12日にWindows Phone Developer ToolsのBeta版が公開されました。CTP
「Windows Phone Developer Tools Beta」
- Visual Studio 2010 Express for Windows Phone Beta
- Windows Phone Emulator Beta
- Silverlight for Windows Phone Beta
- Microsoft Expression Blend for Windows Phone Beta
- XNA Game Studio 4.
0 Beta
Developer Toolsに同梱されているソフトウェアも当然ながらすべてBeta版にバージョンアップされています。心配していたExoression BlendもどうやらWindows Phone向けに機能制限をして、
同時に今のWindows Mobileで言うところのActive Sync/
Windows Phone 7 開発者のサイトを開くと、
まだ日本ではどのキャリアから発売されるか、
はじめに
前回は、
実際にコードを提示する前にボタンの状態について考えてみましょう。Windows Mobileのボタンには以下の4つの状態があります。
- 通常の状態
- フォーカスが当っている状態
- ボタンが押されている状態
- ボタンが無効
(Disable) になっている状態
今回は通常の状態のボタンを表示させるまでを行います。手を加えないといけないソースコードが多くなってきましたので、
- GradientionSample.
zip (19. 3KB)
グラデーションボタンコントロールを作る
名前はそのまま
using System;
using System.Linq;
using System.Collections.Generic;
using System.Text;
using System.Windows.Forms;
using System.Drawing;

namespace GradientionSample
{
    public class GradientionButton : Control
    {
        private void DrawButton(Graphics g, bool pressed, bool focused)
        {
        }

        protected override void OnPaint(PaintEventArgs e)
        {
            // とりあえず通常の状態のボタンを表示する
            bool pressed = false;
            bool focused = false;

            DrawButton(e.Graphics, pressed, focused);
        }

        protected override void OnPaintBackground(PaintEventArgs e)
        {
        }
    }
}
現在
角丸矩形を描画するための準備
角丸の矩形を表示するには、
RoundRect関数は設定されたPenオブジェクトとSolidBrushオブジェクトにて描画を行いますので、
namespace GradientionSample
{
    public sealed class Win32
    {
        // ~ 省略 ~

        // 角丸の矩形を描画するのに使用
        [DllImport("coredll.dll")]
        public static extern bool RoundRect(IntPtr hdc, int nLeftRect, int nTopRect,
        int nRightRect, int nBottomRect, int nWidth, int nHeight);

        [DllImport("coredll.dll")]
        public static extern IntPtr CreateSolidBrush(uint crColor);

        [DllImport("coredll.dll")]
        public static extern IntPtr CreatePen(int fnPenStyle, int nWidth, uint crColor);

        [DllImport("coredll.dll")]
        public static extern IntPtr SelectObject(IntPtr hdc, IntPtr hgdiobj);

        [DllImport("coredll.dll")]
        public static extern bool DeleteObject(IntPtr hObject);

        public static uint RGB(Color color)
        {
            return 0x00000000 | ((uint)(color.B) << 16) | ((uint)(color.G) << 8) | (uint)(color.R);
        }

    }
}
これでマネージコードからネイティブ関数を使うためのP/
角丸グラデーションボタンを描画するための準備
前回作成したGraphicsExtensionクラスに、
Graphicsオブジェクトが保持しているデバイスコンテキストのハンドルを取り出し、
namespace GradientionSample
{
    public class GraphicsExtension
    {
        // ~ 省略 ~

        public static void FillRoundRect(Graphics g,
            Rectangle rc, Color fillColor, Color borderColor, int borderWidth)
        {
            IntPtr brush = IntPtr.Zero;
            IntPtr oldBrush = IntPtr.Zero;
            IntPtr pen = IntPtr.Zero;
            IntPtr oldPen = IntPtr.Zero;

            IntPtr hdc = g.GetHdc();

            brush = Win32.CreateSolidBrush(Win32.RGB(fillColor));
            oldBrush = Win32.SelectObject(hdc, brush);

            if (borderColor == Color.Empty)
            {
                pen = Win32.CreatePen(0, 1, Win32.RGB(borderColor));
                oldPen = Win32.SelectObject(hdc, pen);
            }

            Win32.RoundRect(hdc, rc.Left, rc.Top, rc.Right, rc.Bottom, 20, 20);

            if (borderColor == Color.Empty)
            {
                Win32.SelectObject(hdc, oldPen);
                Win32.DeleteObject(pen);
            }
            Win32.SelectObject(hdc, oldBrush);
            Win32.DeleteObject(brush);

            g.ReleaseHdc(hdc);
}外部から呼び出し可能な形でDrawGradientRoundRectButtonメソッドを実装します。前回グラデーションイメージを作成して任意の形でクリッピングする処理を共通化していますので、
        public static void DrawGradientRoundRectButton(
            Graphics g, Rectangle rc,
            Color startColor, Color endColor, Color borderColor,
            FillDirection gradientType)
        {
            InnerDrawGradient(g, rc, startColor,
                endColor, borderColor, gradientType,
                new InnderDrawFunction(_DrawGradientRoundRectButton));
        }
_DrawGradientRoundRectButtonメソッドでは、
        private static void _DrawGradientRoundRectButton(Graphics g,
            Rectangle rc, Color fillColor, Color borderColor)
        {
            // 背景は透過色でクリアしておく
            g.Clear(KeyColor);

            // 角丸矩形を描画する
            FillRoundRect(g, rc, fillColor, borderColor, 2);
        }
    }
}
今回のボタンの見た目に角丸でグラデーションが掛かっているだけです。_DrawGradientRoundRectButtonメソッドに光沢を表示させるような処理を入れる等、
角丸のグラデーションボタンを描画する
さてGradientionButtonクラスに戻って、
namespace GradientionSample
{
    public class GradientionButton : Control
    {
        private void DrawButton(Graphics g, bool pressed, bool focused)
        {
          // ボタンの背景を描画
          Pen backLinePen;
          backLinePen = new Pen(Color.Black);

          // DrawRectangleメソッドで線を描画するが
          // 線の太さを考慮して幅と高さから引く
          Rectangle lineRect = new Rectangle();
          lineRect.X = ClientRectangle.X;
          lineRect.Y = ClientRectangle.Y;
          lineRect.Width = ClientRectangle.Width - (int)backLinePen.Width;
          lineRect.Height = ClientRectangle.Height - (int)backLinePen.Width;

          g.FillRectangle(new SolidBrush(Color.DimGray), ClientRectangle);
          g.DrawRectangle(backLinePen, lineRect);

          // ボタンの表示領域
          Rectangle btnRect = ClientRectangle;
          btnRect.X += 2;
          btnRect.Y += 2;
          btnRect.Width -= 4;
          btnRect.Height -= 4;

          Color stColor, edColor;
          stColor = Color.Red;
          edColor = Color.Black;

          // 角丸グラデーションボタンの描画
          GraphicsExtension.DrawGradientRoundRectButton(
              g, btnRect, stColor, edColor, Color.Black, FillDirection.TopToBottom);

          // ボタンに表示するテキストの表示(テキストは中央に表示)
          StringFormat sf = new StringFormat();
          sf.LineAlignment = StringAlignment.Center;
          sf.Alignment = StringAlignment.Center;
          g.DrawString(Text, Font, new SolidBrush(Color.White), btnRect, sf);
        }

        // ~ 省略 ~
    }
}
標準のボタンと並べてGradientionButtonをフォーム上に配置してみました。デバッグ実行した様子です。
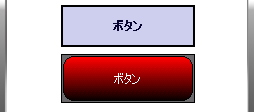
さいごに
グラデーションの掛かったボタンを作ることができました。ただ、
次回は、
以上で今回は終わりです。ありがとうございました。