前回はConsulの登場背景や使いどころについて扱いました。今回はConsulを実際に使うために、
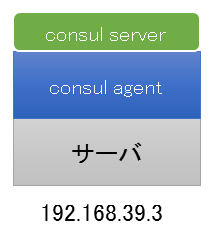
動作確認のための最小構成
Consulの基本動作を確認するための最小環境は、

なお、
Consulのセットアップ
Consulを使い始めるには、
以下はLinux
$ wget -O 0.5.0_linux_amd64.zip https://dl.bintray.com/mitchellh/consul/0.5.0_linux_amd64.zip
$ unzip 0.5.0_linux_amd64.zip
$ sudo cp consul /usr/bin/consul
以上でセットアップ作業は完了です。Consulはconsulという名前のバイナリのみで動作するため、consul versionと実行します。
$ consul version
Consul v0.5.0
Consul Protocol: 2 (Understands back to: 1)
ここで
Web UIのセットアップ
Consulは、
$ wget -O 0.5.0_web_ui.zip https://dl.bintray.com/mitchellh/consul/0.5.0_web_ui.zip
$ unzip 0.5.0_web_ui.zip
$ sudo mv dist /opt/consul/dist
移動したディレクトリを控えておき、
Consulサーバの起動
Consulエージェントをサーバとして起動するには、consul agentコマンドを使う時、
-serverエージェントをサーバ状態にします
(必須)。 -bootstrap-expect=1Consulサーバを1台で構成することを明示します
(必須)。 -data-dir=/tmp/consul データ保管場所を指定します
(必須)。 -bind=192.168. 39. 3 複数のネットワークインターフェースがある環境では、
どのIPアドレスを利用するか選べます。
これらのオプションを使って起動すると、
# consul agent -server -bootstrap-expect=1 -data-dir=/tmp/consul -bind=192.168.39.3
==> WARNING: BootstrapExpect Mode is specified as 1; this is the same as Bootstrap mode.
==> WARNING: Bootstrap mode enabled! Do not enable unless necessary
==> Starting Consul agent...
==> Starting Consul agent RPC...
==> Consul agent running!
         Node name: 'sion.pocketstudio.net'
        Datacenter: 'dc1'
            Server: true (bootstrap: true)
       Client Addr: 127.0.0.1 (HTTP: 8500, HTTPS: -1, DNS: 8600, RPC: 8400)
      Cluster Addr: 192.168.39.3 (LAN: 8301, WAN: 8302)
    Gossip encrypt: false, RPC-TLS: false, TLS-Incoming: false
             Atlas: <disabled>

==> Log data will now stream in as it occurs:
Consulエージェントを終了するには、Ctrl+Cキーで中断するか、killコマンドで停止できます。
メンバー管理とサービス検出
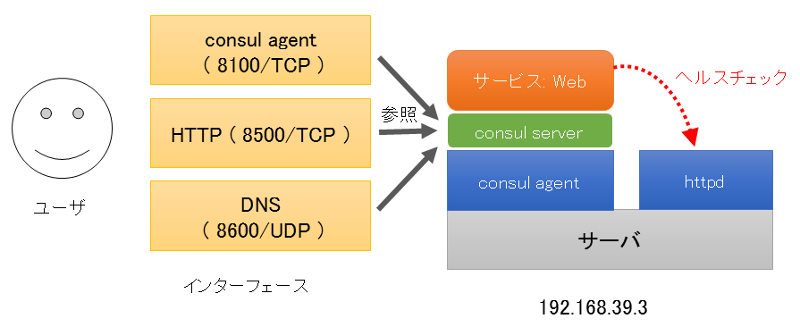
最小構成上で、
| インターフェース | 取得方法 | ポート番号 |
|---|---|---|
| consulエージェント | consulコマンドで参照 | 8100(TCP) |
| HTTPインターフェース | curlやwget等で参照 | 8500(TCP) |
| DNSインターフェース | hostやdigなどホスト名の名前解決時に参照 | 8600(UDP) |
ここで参照できる情報は、

Consulのメンバー情報を参照
Consulのメンバー管理に含まれるのは、consul membersコマンドを使う方法です。Consulサーバに別の端末からログインし、
$ consul members
Node                   Address            Status  Type    Build  Protocol
sion.pocketstudio.net  192.168.39.3:8301  alive   server  0.5.0  2
この情報はConsulサーバが持つHTTPインターフェースから知ることもできます。HTTPインターフェースにはTCPポート8500番を使ってアクセスします。次の例はcurlコマンドを使って、
$ curl http://127.0.0.1:8500/v1/catalog/nodes | jq "."
[
  {
    "Address": "192.168.39.3",
    "Node": "sion.pocketstudio.net"
  }
]
この表示結果は、consul membersを実行したときと同様、
同様に、digコマンドを使いポート8600に対して問い合わせてみます。
Consulの名前解決には<ホスト名>.node.で名前解決を行います。今回の例であれば、digコマンドを実行すると、
$ dig @127.0.0.1 -p 8600 sion.pocketstudio.net.node.consul
(省略)
;; QUESTION SECTION:
;sion.pocketstudio.net.node.consul. IN  A

;; ANSWER SECTION:
sion.pocketstudio.net.node.consul. 0 IN A       192.168.39.3
サービスの定義と参照方法
Consul上のサービスとは、
サービスを定義するには、
$ sudo mkdir /etc/consul.d
次に、web.と言うファイルを作成し、
{
    "service": {
        "name": "web",
        "tags": ["test"],
        "port": 80
    }
}それから、Ctrl+Cキーで中断したあと、-config-dir=/etc/オプションを追加します。
$ consul agent -server -bootstrap-expect=1 -data-dir=/tmp/consul -bind=192.168.39.3 -config-dir=/etc/consul.d
(省略)
    2015/04/22 11:48:14 [INFO] agent: Synced service 'web'
これで/v1/にアクセスします。正常に実行されると、
$ curl http://127.0.0.1:8500/v1/catalog/service/web | jq "."
[
  {
    "ServicePort": 80,
    "ServiceAddress": "",
    "ServiceTags": [
      "test"
    ],
    "ServiceName": "web",
    "ServiceID": "web",
    "Address": "192.168.39.3",
    "Node": "sion.pocketstudio.net"
  }
]
同様にDNSインターフェースから情報を参照することができます。単純にwebという名称のサービスを持つホストのIPアドレスを参照するときは、web.という名称で名前解決を行います。
# dig @127.0.0.1 -p 8600 web.service.consul a

;; QUESTION SECTION:
;web.service.consul.            IN      A

;; ANSWER SECTION:
web.service.consul.     0       IN      A       192.168.39.3
ここでは1台のみの結果しか表示されていませんが、SRVレコードを参照することで、
# dig @127.0.0.1 -p 8600 web.service.consul SRV

;; QUESTION SECTION:
;web.service.consul.            IN      SRV

;; ANSWER SECTION:
web.service.consul.     0       IN      SRV     1 1 80 sion.pocketstudio.net.node.dc1.consul.
まとめ
今回はConsulの最小構成でインターフェースの参照方法や、


