はじめに
これまでの連載で、
今回は次の内容を解説します。
- バックアップの種類
- リストアの手法
- bconsoleを使ったリストア
- 別マシンへのリストア
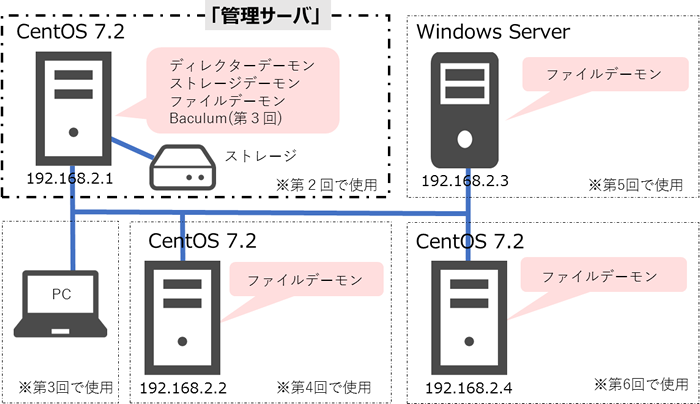
バックアップの種類
すでに第1回で説明しましたが、
フルバックアップ
バックアップ対象のファイルをすべてバックアップします。定期的にバックアップを行う場合、
- メリット:リストアの手順が減ります。
- デメリット:データ量が多いと、
バックアップに時間がかかります。保存先のデバイスも容量が大きいものが必要になります。
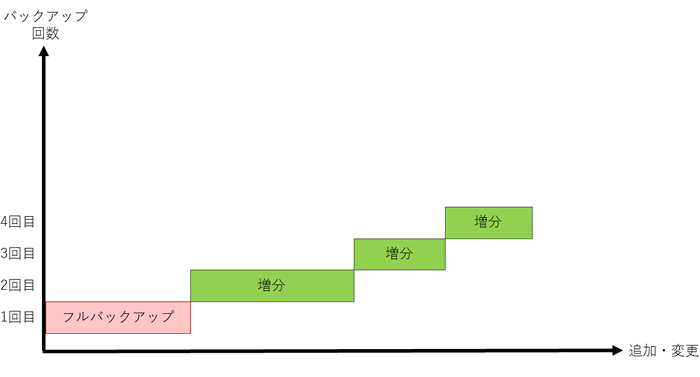
増分バックアップ
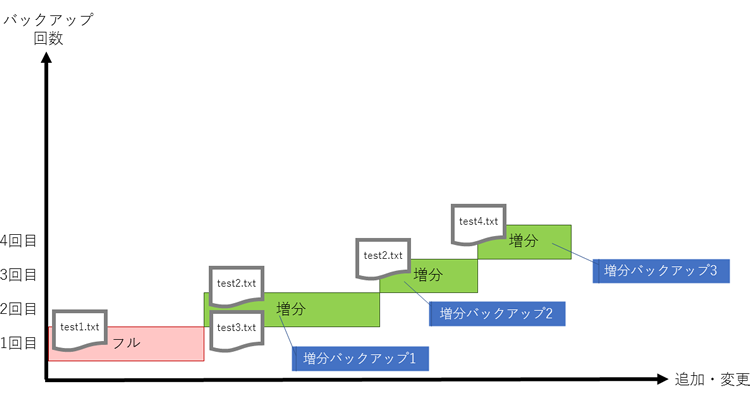
前回実施したバックアップから、
- メリット:すべてのファイルをバックアップするわけではないので、
保存先のデバイス容量は他のバックアップ方式に比べて小さくて済みます。 - デメリット:ディレクトリごとリストアするような場合、
リストアを複数回行う必要があります。図2の場合、 4回のリストアが必要です。
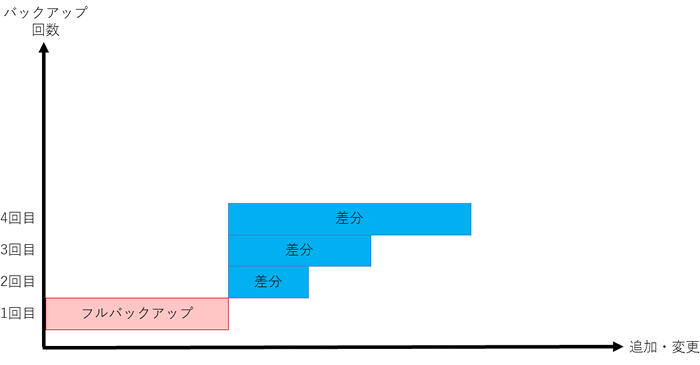
差分バックアップ
直近に行われたフルバックアップから、
- メリット:増分バックアップに比べると、
リストアの回数が減ります。最大2回で済みます。 - デメリット:バックアップする度に重複してバックアップするファイルが増えるので、
保存先のデバイス容量が大きくなります。
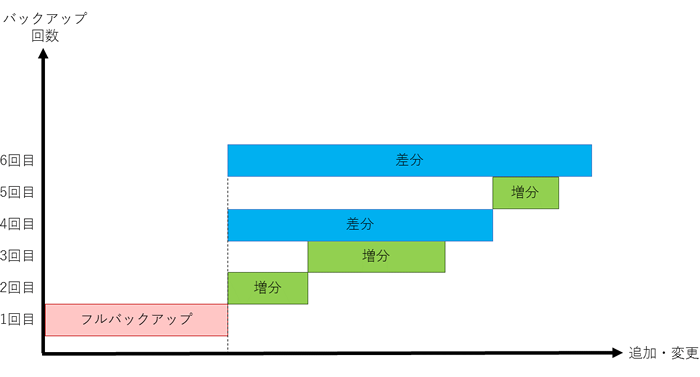
混合バックアップ
図4を見ると、
リストアの手法
差分バックアップや増分バックアップを使用している場合、
以下の例を元に説明します。
Bacula-testというディレクトリ下に、
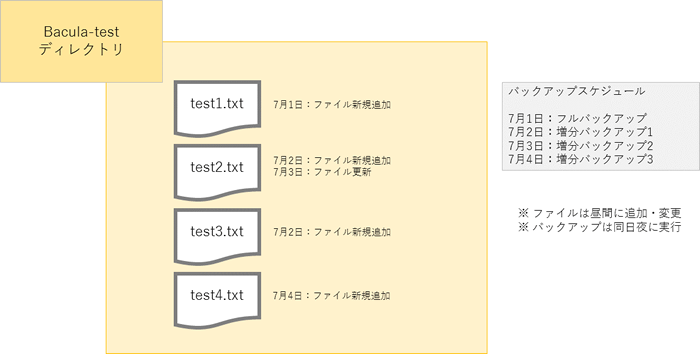
バックアップは1日に1回実施しており、
任意のファイルのみリストア
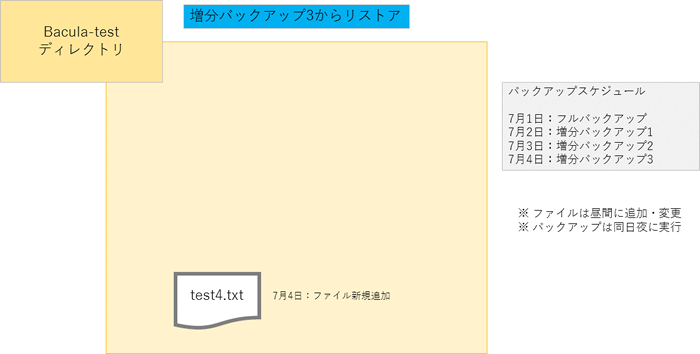
任意のファイルのみリストアする場合、
以下の例図は、
ディレクトリ内のファイルを完全リストア
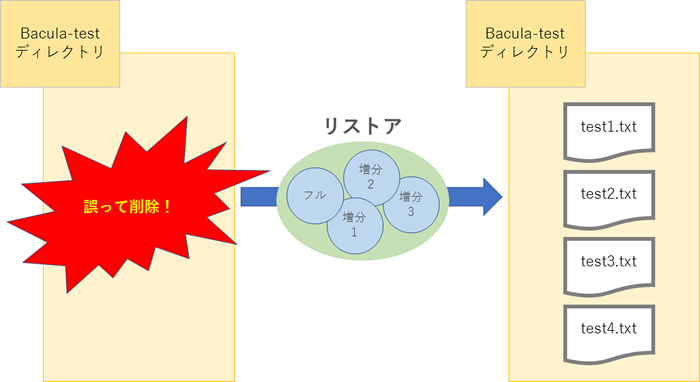
では、
バックアップ群とは、

複数のファイルを復元したい場合、
次でBaculaの管理ツールbconsoleを使用したリストア方法を説明します。
bconsoleを利用したリストア
bconsoleはBaculaのCUI形式の管理ツールです。baculumのようなGUIも内部ではbconsoleを使用しています。GUIの操作については第3回で行っているので、
リストアの各項目
bconsoleを起動します。
# bconsole
Connecting to Director localhost:9101
1000 OK: 102 bacula-dir Version: 7.4.4 (20 September 2016)
Enter a period to cancel a command.
*
restoreを入力します。13の項目がでてきます。
*restore
Automatically selected Catalog: MyCatalog
Using Catalog "MyCatalog"

First you select one or more JobIds that contain files
to be restored. You will be presented several methods
of specifying the JobIds. Then you will be allowed to
select which files from those JobIds are to be restored.

To select the JobIds, you have the following choices:
     1: List last 20 Jobs run
     2: List Jobs where a given File is saved
     3: Enter list of comma separated JobIds to select
     4: Enter SQL list command
     5: Select the most recent backup for a client
     6: Select backup for a client before a specified time
     7: Enter a list of files to restore
     8: Enter a list of files to restore before a specified time
     9: Find the JobIds of the most recent backup for a client
    10: Find the JobIds for a backup for a client before a specified time
    11: Enter a list of directories to restore for found JobIds
    12: Select full restore to a specified Job date
    13: Cancel
Select item:  (1-13):
各項目は、
- 1: List last 20 Jobs run
- 直近の20個のバックアップジョブを一覧で表示します。
- 2: List Jobs where a given File is saved
- 任意のファイルがどのジョブでバックアップされたのか一覧で表示します。
- 3: Enter list of comma separated JobIds to select
- 指定したバックアップのjobidからリストアします。
- 4: Enter SQL list command
- SQLコマンドを使用し、
Baculaで使用しているDBを操作します。 - 5: Select the most recent backup for a client
- 直近のバックアップ群からリストアします。
- 6: Select backup for a client before a specified time
- 指定した日時より前のバックアップ群からリストアします。
- 7: Enter a list of files to restore
- 任意のファイルを最新のバックアップからリストアします。
- 8: Enter a list of files to restore before a specified time
- 任意のファイルを指定した日時の直前に行ったバックアップからリストアします。
- 9: Find the JobIds of the most recent backup for a client
- 対象クライアントの最新のバックアップ群情報を表示します。
- 10: Find the JobIds for a backup for a client before a specified time
- 指定した日時より前のバックアップ群の情報を表示します。
- 11: Enter a list of directories to restore for found JobIds
- JobIdからリストアするディレクトリを入力し、
リストアを行います。 - 12: Select full restore to a specified Job date
- 指定したJobIdに関連するバックアップ群からリストアします。
- 13: Cancel
- 処理をキャンセルします。
日付の入力
選択した項目によっては、
Select item:  (1-13): 8
The restored files will the most current backup
BEFORE the date you specify below.

Enter date as YYYY-MM-DD HH:MM:SS :
リストア対象の選択
選択したリストア項目によっては、
Baculaはディレクトリを含めてバックアップを行うため、
cdコマンドやlsコマンドを利用し、
You are now entering file selection mode where you add (mark) and
remove (unmark) files to be restored. No files are initially added, unless
you used the "all" keyword on the command line.
Enter "done" to leave this mode.

cwd is: /
$ cd C:/Users/admin01/Desktop/Bacula-test/
cwd is: C:/Users/admin01/Desktop/Bacula-test/
markコマンド、
$ mark test2.txt
1 file marked.
markコマンドやaddコマンドは、
cwd is: /
$ mark C:*
2 files marked.
cwd is: /
$ mark C?
2 files marked.
ただし、
cwd is: /
$ mark C:/Users*
No files marked.
指定したファイルの一覧を表示するには、
$ lsmark
*test2.txt
これらを繰り返してリストア対象を選び終えたら、
リストアのジョブ設定の変更
bconsoleを使用したリストアでは、
Run Restore job
JobName:         RestoreFiles
Bootstrap:       /var/spool/bacula/bacula-dir.restore.1.bsr
Where:           /tmp/bacula-restores
Replace:         Always
FileSet:         Full Set
Backup Client:   bacula-win-fd
Restore Client:  bacula-win-fd
Storage:         File1
When:            2017-02-28 13:22:37
Catalog:         MyCatalog
Priority:        10
Plugin Options:
OK to run? (yes/mod/no): mod
Parameters to modify:
     1: Level
     2: Storage
     3: Job
     4: FileSet
     5: Restore Client
     6: When
     7: Priority
     8: Bootstrap
     9: Where
    10: File Relocation
    11: Replace
    12: JobId
    13: Plugin Options
Select parameter to modify (1-13):
- 1: Level
- 仕様上表示してありますが、
リストアでは変更できません。 - 2: Storage
- データの保存先を指定します。
- 3: Job
- 仕様上表示してありますが、
絶対に変更しないでください。リストアに失敗します。 - 4: FileSet
- 仕様上表示してありますが、
リストアでは使用しません。 - 5: Restore Client
- 復元先のクライアントを指定します。Backup Clientとは別のクライアントを指定することで、
別マシンへのリストアが可能となります。 - 6: When
- 実行日時を指定します。過去日付を指定した場合、
即時実行されます。 - 7: Priority
- 優先度合いを指定します。
- 8: Bootstrap
- リストアに関する情報が書かれたファイルです。
- 9: Where
- 復元先のディレクトリパスを指定します。10番のFile Relocationと同時使用はできません。
- 10: File Relocation
- 復元ファイルのパスやファイル名を変更します。9番のWhereとの同時使用はできません。
- 1: Strip prefix:復元もとのパスを取り除きます。
- 2: Add prefix:リストア対象の前につけるディレクトリを指定します。
- 3: Add file suffix:リストア対象のファイル名の後ろに付与する任意の文字を指定します。
- 4: Enter a regexp:正規表現を使い、
変更します。 - 5: Test filename manipulation:設定した内容を確認します。
- 6: Use this ?:設定を完了します。
- 11: Replace
- 復元先のディレクトリに同一名のファイルがあった場合、
どのような動きをするかを指定します。 - 1: Always:常に上書きします。
- 2: IfNewer:復元もとのファイルが新しければ、
上書きします。 - 3: IfOlder:復元先のファイルが新しければ、
上書きします。 - 4: Never:上書きしません。
- 12: JobId
- 仕様上表示してありますが、
リストアでは変更できません。 - 13: Plugin Options
- プラグイン用のオプションです。コミュニティ版では使用しません。
利用シーンに応じたリストア方法
今までの連載でバックアップしたファイルを、
事前準備
今までの連載でバックアップしたファイルを、
Baculaのパッケージは、
| Linux | CentOS7. |
|---|---|
| IPアドレス | 192. |
| Baculaパッケージ | 7. |
| Bacula Client Name | bacula-fd2 |
# yum install bacula-client bacula-common bacula-libs
Baculaは以下のポートで通信を行います。Firewallなど通信をブロックするものは設定を変更してください。
| ポート番号 | 利用目的 |
|---|---|
| 9102(TCP) | ファイルデーモン通信用 |

復元対象ファイルを探してリストアを行う
実際にリストアを行おうとすると、
*bconsoleの起動とrestoreの入力は省略し、
リストの2を選択します。
To select the JobIds, you have the following choices:
     1: List last 20 Jobs run
     2: List Jobs where a given File is saved
     3: Enter list of comma separated JobIds to select
     4: Enter SQL list command
     5: Select the most recent backup for a client
     6: Select backup for a client before a specified time
     7: Enter a list of files to restore
     8: Enter a list of files to restore before a specified time
     9: Find the JobIds of the most recent backup for a client
    10: Find the JobIds for a backup for a client before a specified time
    11: Enter a list of directories to restore for found JobIds
    12: Select full restore to a specified Job date
    13: Cancel
Select item:  (1-13): 2
バックアップを行ったクライアントを選択します。
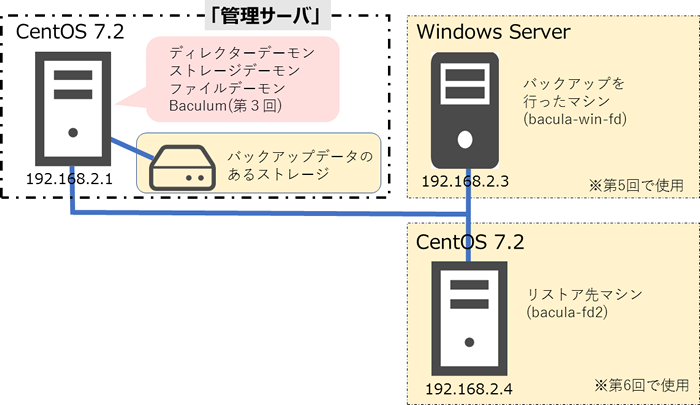
以下の例では3のbacula-win-fdを選択します。
Defined Clients:
     1: bacula-fd
     2: bacula-fd2
     3: bacula-win-fd
Select the Client (1-3): 3
復元したいファイル名を入力します。このとき、
Enter Filename (no path):test2.txt
+-------+------------------------------------------------+---------------------+---------+-----------+----------+----------+
| JobId | Name                                           | StartTime           | JobType | JobStatus | JobFiles | JobBytes |
+-------+------------------------------------------------+---------------------+---------+-----------+----------+----------+
| 191   | C:/Users/admin01/Desktop/Bacula-test/test2.txt | 2017-02-10 04:20:22 | B       | T         | 2        | 288      |
| 190   | C:/Users/admin01/Desktop/Bacula-test/test2.txt | 2017-02-10 04:19:34 | B       | T         | 6        | 1212     |
| 188   | C:/Users/admin01/Desktop/Bacula-test/test2.txt | 2017-02-10 02:42:02 | B       | T         | 6        | 1212     |
| 170   | C:/Users/admin01/Desktop/Bacula-test/test2.txt | 2017-02-09 06:16:50 | B       | T         | 2        | 288      |
| 169   | C:/Users/admin01/Desktop/Bacula-test/test2.txt | 2017-02-09 06:15:38 | B       | T         | 4        | 818      |
| 168   | C:/Users/admin01/Desktop/Bacula-test/test2.txt | 2017-02-09 06:13:42 | B       | T         | 3        | 537      |
| 163   | C:/Users/admin01/Desktop/Bacula-test/test2.txt | 2017-02-05 23:05:01 | B       | T         | 3        | 537      |
| 138   | C:/Users/admin01/Desktop/Bacula-test/test2.txt | 2017-01-31 07:41:45 | B       | T         | 2        | 288      |
| 137   | C:/Users/admin01/Desktop/Bacula-test/test2.txt | 2017-01-31 07:40:33 | B       | T         | 3        | 537      |
| 99    | C:/Users/admin01/Desktop/Bacula-test/test2.txt | 2017-01-26 09:40:58 | B       | T         | 5        | 931      |
| 69    | C:/Users/admin01/Desktop/Bacula-test/test2.txt | 2017-01-20 07:04:24 | B       | T         | 5        | 1099     |
| 68    | C:/Users/admin01/Desktop/Bacula-test/test2.txt | 2017-01-20 06:44:13 | B       | T         | 5        | 811      |
+-------+------------------------------------------------+---------------------+---------+-----------+----------+----------+
つづいて、
To select the JobIds, you have the following choices:
     1: List last 20 Jobs run
     2: List Jobs where a given File is saved
     3: Enter list of comma separated JobIds to select
     4: Enter SQL list command
     5: Select the most recent backup for a client
     6: Select backup for a client before a specified time
     7: Enter a list of files to restore
     8: Enter a list of files to restore before a specified time
     9: Find the JobIds of the most recent backup for a client
    10: Find the JobIds for a backup for a client before a specified time
    11: Enter a list of directories to restore for found JobIds
    12: Select full restore to a specified Job date
    13: Cancel
Select item:  (1-13): 3
リストアしたいJobIdを入力します。今回の例では、
Enter JobId(s), comma separated, to restore: 170
You have selected the following JobId: 170

Building directory tree for JobId(s) 170 ...
1 files inserted into the tree.
cdコマンドを使い、
You are now entering file selection mode where you add (mark) and
remove (unmark) files to be restored. No files are initially added, unless
you used the "all" keyword on the command line.
Enter "done" to leave this mode.

cwd is: /
$ cd C:/Users/admin01/Desktop/Bacula-test/
cwd is: C:/Users/admin01/Desktop/Bacula-test/
リストア対象のファイルをmarkコマンドでリストア対象にします。
$ mark test2.txt
1 file marked.
lsmarkコマンドで、
$ lsmark
*test2.txt
doneを入力すると、
$ done
リストア設定の内容が表示されます。
Bootstrap records written to /var/spool/bacula/bacula-dir.restore.3.bsr
Bootstrap records written to /var/spool/bacula/bacula-dir.restore.3.bsr

The Job will require the following (*=>InChanger):
   Volume(s)                 Storage(s)                SD Device(s)
===========================================================================

    Vol-0001                  File1                     FileChgr1

Volumes marked with "*" are in the Autochanger.


1 file selected to be restored.

Run Restore job
JobName:         RestoreFiles
Bootstrap:       /var/spool/bacula/bacula-dir.restore.3.bsr
Where:           /tmp/bacula-restores
Replace:         Always
FileSet:         Full Set
Backup Client:   bacula-win-fd
Restore Client:  bacula-win-fd
Storage:         File1
When:            2017-02-28 13:22:37
Catalog:         MyCatalog
Priority:        10
Plugin Options:
OK to run? (yes/mod/no):
変更がある場合は、
OK to run? (yes/mod/no): mod
Parameters to modify:
     1: Level
     2: Storage
     3: Job
     4: FileSet
     5: Restore Client
     6: When
     7: Priority
     8: Bootstrap
     9: Where
    10: File Relocation
    11: Replace
    12: JobId
    13: Plugin Options
Select parameter to modify (1-13):
この例では、
Select parameter to modify (1-13): 5
The defined Client resources are:
     1: bacula-fd
     2: bacula-win-fd
     3: bacula-fd2
Select Client (File daemon) resource (1-3): 3
変更後の設定内容が表示されるので、
Run Restore job
JobName:         RestoreFiles
Bootstrap:       /var/spool/bacula/bacula-dir.restore.3.bsr
Where:           /tmp/bacula-restores
Replace:         Always
FileSet:         Full Set
Backup Client:   bacula-win-fd
Restore Client:  bacula-fd2
Storage:         File1
When:            2017-02-28 13:22:37
Catalog:         MyCatalog
Priority:        10
Plugin Options:
OK to run? (yes/mod/no):
この設定内容で問題なければ、
OK to run? (yes/mod/no): yes
Job queued. JobId=194
直近のバックアップ群からリストアを行う
一番多いリストアは、
*bconsoleの起動とrestoreの入力は省略し、
To select the JobIds, you have the following choices:
     1: List last 20 Jobs run
     2: List Jobs where a given File is saved
     3: Enter list of comma separated JobIds to select
     4: Enter SQL list command
     5: Select the most recent backup for a client
     6: Select backup for a client before a specified time
     7: Enter a list of files to restore
     8: Enter a list of files to restore before a specified time
     9: Find the JobIds of the most recent backup for a client
    10: Find the JobIds for a backup for a client before a specified time
    11: Enter a list of directories to restore for found JobIds
    12: Select full restore to a specified Job date
    13: Cancel
Select item:  (1-13): 5
バックアップを行ったクライアントを選択します。

ここでは3のbasula-win-fdを選択します。
Defined Clients:
     1: bacula-fd
     2: bacula-fd2
     3: bacula-win-fd
Select the Client (1-3): 3
直近のバックアップ群の一覧が表示されます。
Automatically selected FileSet: Win Set
+-------+-------+----------+----------+---------------------+------------+
| JobId | Level | JobFiles | JobBytes | StartTime           | VolumeName |
+-------+-------+----------+----------+---------------------+------------+
|   211 | F     |        3 |      537 | 2017-02-28 15:39:57 | Vol-0002   |
|   212 | I     |        4 |      818 | 2017-02-28 15:42:29 | Vol-0002   |
|   213 | I     |        2 |      288 | 2017-02-28 15:47:29 | Vol-0002   |
|   214 | I     |        3 |      537 | 2017-02-28 15:49:31 | Vol-0002   |
+-------+-------+----------+----------+---------------------+------------+
You have selected the following JobIds: 211,212,213,214

Building directory tree for JobId(s) 211,212,213,214 ...
4 files inserted into the tree.

You are now entering file selection mode where you add (mark) and
remove (unmark) files to be restored. No files are initially added, unless
you used the "all" keyword on the command line.
Enter "done" to leave this mode.

cwd is: /
cdコマンドやlsコマンドでバックアップ群のすべてのファイルを確認できます。
$ cd C:/
cwd is: C:/
$ cd Users/admin01/Desktop
cwd is: C:/Users/admin01/Desktop/
$ ls
Bacula-test/
$ cd Bacula-test/
cwd is: C:/Users/admin01/Desktop/Bacula-test/
$ ls
test1.txt.txt
test2.txt.txt
test3.txt.txt
test4.txt.txt
markコマンド、
$ mark test*
4 files marked.
$ done
リストアジョブの設定内容が表示されます。
Bootstrap records written to /var/spool/bacula/bacula-dir.restore.3.bsr
Bootstrap records written to /var/spool/bacula/bacula-dir.restore.3.bsr

The Job will require the following (*=>InChanger):
   Volume(s)                 Storage(s)                SD Device(s)
===========================================================================

    Vol-0002                  File1                     FileChgr1

Volumes marked with "*" are in the Autochanger.


4 files selected to be restored.

Run Restore job
JobName:         RestoreFiles
Bootstrap:       /var/spool/bacula/bacula-dir.restore.3.bsr
Where:           /tmp/bacula-restores
Replace:         Always
FileSet:         Full Set
Backup Client:   bacula-win-fd
Restore Client:  bacula-win-fd
Storage:         File1
When:            2017-03-01 17:56:05
Catalog:         MyCatalog
Priority:        10
Plugin Options:
OK to run? (yes/mod/no):
編集する場合は、
OK to run? (yes/mod/no): mod
Parameters to modify:
     1: Level
     2: Storage
     3: Job
     4: FileSet
     5: Restore Client
     6: When
     7: Priority
     8: Bootstrap
     9: Where
    10: File Relocation
    11: Replace
    12: JobId
    13: Plugin Options
Select parameter to modify (1-13): 5
復元先を4.
The defined Client resources are:
     1: bacula-fd
     2: bacula-win-fd
     3: bacula-fd2
Select Client (File daemon) resource (1-3): 3
設定内容を確認し、
Run Restore job
JobName:         RestoreFiles
Bootstrap:       /var/spool/bacula/bacula-dir.restore.3.bsr
Where:           /tmp/bacula-restores
Replace:         Always
FileSet:         Full Set
Backup Client:   bacula-win-fd
Restore Client:  bacula-fd2
Storage:         File1
When:            2017-03-01 17:56:05
Catalog:         MyCatalog
Priority:        10
Plugin Options:
OK to run? (yes/mod/no): yes
Job queued. JobId=222
リストアの確認
リストアの確認は、
statusでリストア先のクライアントを選択すると、
*status
Status available for:
     1: Director
     2: Storage
     3: Client
     4: Scheduled
     5: All
Select daemon type for status (1-5): 3
The defined Client resources are:
     1: bacula-fd
     2: bacula-win-fd
     3: bacula-fd2
3
Connecting to Client bacula-fd2 at 10.0.1.9:9102

bacula-fd Version: 7.4.5 (07 February 2017)  x86_64-redhat-linux-gnu redhat (Core)
Daemon started 03-Mar-17 00:35. Jobs: run=0 running=0.
 Heap: heap=135,168 smbytes=19,331 max_bytes=19,348 bufs=66 max_bufs=66
 Sizes: boffset_t=8 size_t=8 debug=0 trace=0 mode=0 bwlimit=0kB/s
 Plugin: bpipe-fd.so

Running Jobs:
Director connected at: 03-Mar-17 05:21
No Jobs running.
====

Terminated Jobs:
 JobId  Level      Files    Bytes   Status   Finished        Name
===================================================================
   218  Restore        1       288   OK       28-Feb-17 08:15 RestoreFiles
   219  Restore        1       288   OK       28-Feb-17 08:21 RestoreFiles
   220  Restore        1       288   OK       28-Feb-17 08:36 RestoreFiles
   221  Restore        1       288   OK       28-Feb-17 09:00 RestoreFiles
   222  Restore        4    1.131 K  OK       01-Mar-17 08:57 RestoreFiles
====
*
list joblog jobid=ジョブIDで、
*list joblog jobid=222
+----------------------------------------------------------------------------------------------------+
| LogText                                                                                              |
+----------------------------------------------------------------------------------------------------+
| bacula-dir JobId 222: Start Restore Job RestoreFiles.2017-03-01_17.57.29_03                          |
| bacula-dir JobId 222: Using Device "FileChgr1-Dev1" to read.                                         |
| bacula-sd JobId 222: Ready to read from volume "Vol-0002" on file device "FileChgr1-Dev1" (/tmp).    |
| bacula-sd JobId 222: Forward spacing Volume "Vol-0002" to file:block 0:1545886.                      |
| bacula-sd JobId 222: Elapsed time=00:00:01, Transfer rate=1.787 K Bytes/second                       |
| bacula-dir JobId 222: Bacula bacula-dir 7.4.4 (202Sep16):
  Build OS:               x86_64-redhat-linux-gnu redhat (Core)
  JobId:                  222
  Job:                    RestoreFiles.2017-03-01_17.57.29_03
  Restore Client:         bacula-fd2
  Start time:             01-Mar-2017 17:57:31
  End time:               01-Mar-2017 17:57:31
  Files Expected:         4
  Files Restored:         4
  Bytes Restored:         1,131
  Rate:                   0.0 KB/s
  FD Errors:              0
  FD termination status:  OK
  SD termination status:  OK
  Termination:            Restore OK |
| bacula-dir JobId 222: Begin pruning Jobs older than 6 months .                                       |
| bacula-dir JobId 222: No Jobs found to prune.                                                        |
| bacula-dir JobId 222: Begin pruning Files.                                                           |
| bacula-dir JobId 222: No Files found to prune.                                                       |
| bacula-dir JobId 222: End auto prune.                                                                |
+----------------------------------------------------------------------------------------------------+
+-------+--------------+---------------------+------+-------+----------+----------+-----------+
| JobId | Name         | StartTime           | Type | Level | JobFiles | JobBytes | JobStatus |
+-------+--------------+---------------------+------+-------+----------+----------+-----------+
|   222 | RestoreFiles | 2017-03-01 17:57:31 | R    | F     |        4 |    1,131 | T         |
+-------+--------------+---------------------+------+-------+----------+----------+-----------+
Accurateについて
バックアップのJobディレクティブには
たとえば、
例を見てみましょう。以下のようにファイルを変更したあと、
- ファイル名変更:test1.
txt → test1-bk. txt - ファイル削除:test3.
txt
cwd is: /
$ cd C:/Users/admin01/Desktop/Bacula-test/
cwd is: C:/Users/admin01/Desktop/Bacula-test/
$ ls
test1.txt
test1-bk.txt
test2.txt
test3.txt
test4.txt
バックアップ群のすべてのファイルが表示されるため、
cwd is: /
cd C:/Users/admin01/Desktop/Bacula-test
cwd is: C:/Users/admin01/Desktop/Bacula-test/
$ ls
test1-bk.txt
test2.txt
test4.txt
マージされて表示されます。
Accurateオプションの初期値は無効となっています。有効にした場合、
bconsoleは慣れれば使い勝手がよいCUIツールです。オープンソース版のGUIツールも、
次回は、


