さて、
スプリットブレインって?
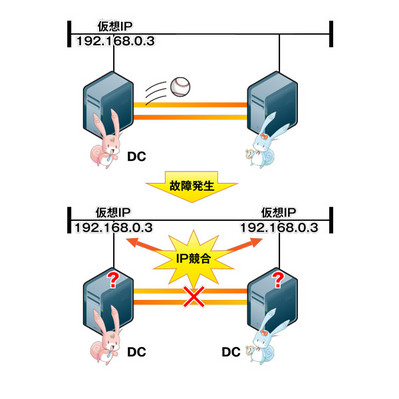
Pacemakerを設定する上で欠かせないのがスプリットブレイン対策です。スプリットブレインとはインターコネクト
通常はあるサーバ

こういった状態を避けるためにインターコネクト用LANは冗長化することが望ましいのですが、
STONITH
STONITHはスプリットブレイン対策として最も有効な機能のひとつで、
この機能を使うには、
# crm ra list stonith
なお上記コマンドで表示されるプラグインは、
では実際に設定してみましょう。クラスタ制御機能
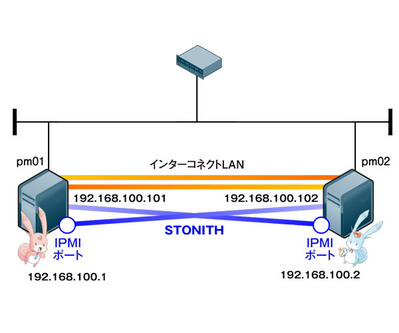
ネットワーク構成はSTONITH専用にインターコネクト用LANとは別のインターフェースを用意し、

| IPMIボード IPアドレス | IPMIボード ユーザID | IPMIボード パスワード | |
|---|---|---|---|
| pm01 | 192. | ipmiuser1 | ipmipass1 |
| pm02 | 192. | ipmiuser2 | ipmipass2 |
まず、
(各サーバで実行)
# yum -y install OpenIPMI-tools
第2回のリソース制御機能
(各サーバで実行)
# /etc/init.d/heartbeat stop
(各サーバで実行)
# rm -f /var/lib/heartbeat/crm/*
# /etc/init.d/heartbeat start
空っぽの状態でPacemakerが起動し、
# crm_mon -A
============
省略
============

Online: [ pm01 pm02 ]

Node Attributes:
* Node pm02:
    + pm01-eth1                         : up
    + pm01-eth2                         : up
* Node pm01:
    + pm02-eth1                         : up
    + pm02-eth2                         : up
では設定していきます。設定には通常のリソース設定と同様にcrmコマンドを使用します。crmコマンドって何?
# crm configure
crm(live)configure#
まずはクラスタ全体の設定です。上記プロンプトで以下の設定を入力します。
- ※
- 見やすいように"\"を使って改行しています。
property $id="cib-bootstrap-options" \
	no-quorum-policy="ignore" \
	stonith-enabled="true" \
	startup-fencing="false"

rsc_defaults resource-stickiness="INFINITY" \
                migration-threshold="1"
stonith-enabled="true" で、
次にプラグインの設定です。今回はIPMIなので、
# crm ra info stonith:external/ipmi
IPMI STONITH external device (stonith:external/ipmi)

ipmitool based power management. Apparently, the power off
method of ipmitool is intercepted by ACPI which then makes
a regular shutdown. If case of a split brain on a two-node
it may happen that no node survives. For two-node clusters
use only the reset method.

Parameters (* denotes required, [] the default):

hostname (string): Hostname
    The name of the host to be managed by this STONITH device.

ipaddr (string): IP Address
    The IP address of the STONITH device.

userid (string): Login
    The username used for logging in to the STONITH device.

passwd (string): Password
    The password used for logging in to the STONITH device.

interface (string, [lan]): IPMI interface
    IPMI interface to use, such as "lan" or "lanplus".

stonith-timeout (time, [60s]):
    How long to wait for the STONITH action to complete. Overrides the stonith-timeout cluster property

priority (integer, [0]):
    The priority of the stonith resource. The lower the number, the higher the priority.

Operations' defaults (advisory minimum):

    start         timeout=60
    stop          timeout=15
    status        timeout=60
    monitor_0     interval=3600 timeout=60
7つのパラメータがあるようです。
ではipmiプラグインを追加してみましょう。まずはpm01をフェンシングするためのリソース設定を追加します。
- ※
- デフォルト値を使用するパラメータ
(stonith-timeout, priority) については設定を省略しています。
primitive stonith1 stonith:external/ipmi \
	params \
		userid="ipmiuser1" \
		passwd="ipmipass1" \
		ipaddr="192.168.100.1" \
		hostname="pm01" \
		interface="lanplus" \
	op start interval="0s" timeout="60s" on-fail="restart" \
	op monitor interval="300s" timeout="60s" on-fail="restart" \
	op stop interval="0s" timeout="60s" on-fail="ignore"
"stonith1"は、
同様にpm02をフェンシングするためのリソース設定を追加します。
primitive stonith2 stonith:external/ipmi \
	params \
		userid="ipmiuser2" \
		passwd="ipmipass2" \
		ipaddr="192.168.100.2" \
		hostname="pm02" \
		interface="lanplus" \
	op start interval="0s" timeout="60s" on-fail="restart" \
	op monitor interval="300s" timeout="60s" on-fail="restart" \
	op stop interval="0s" timeout="60s" on-fail="ignore"
以上の設定だけで一応STONITHリソースは起動しますが、
location location-stonith1 stonith1 \
	rule 200: #uname eq pm02 \
	rule -INFINITY: #uname eq pm01

location location-stonith2 stonith2 \
	rule 200: #uname eq pm01 \
	rule -INFINITY: #uname eq pm02
200や-INFINITY
以上で設定完了です。設定を反映させ、
crm(live)configure# commit
crm(live)configure# exit
実際にSTONITHリソースが起動したかどうか確認してみましょう。
# crm_mon
============
省略
============

Online: [ pm01 pm02 ]

stonith1        (stonith:external/ipmi):        Started pm02
stonith2        (stonith:external/ipmi):        Started pm01
stonith1, stonith2が、
実際にインターコネクト通信のケーブルを全部抜いて、
# crm_mon
============
省略
============

Online: [ pm01 ]
OFFLINE: [ pm02 ]

stonith2        (stonith:external/ipmi):        Started pm01
なお、
primitive vip ocf:heartbeat:IPaddr2 \
        params ip="192.168.68.100" \
                nic="eth0" cidr_netmask="24" \
        op monitor interval="10s"
この"op" の設定には故障時の動作をon-failで定義することができます。たとえば以下のように op stop のon-failにfenceという設定をすると、
primitive vip ocf:heartbeat:IPaddr2 \
        params ip="192.168.68.100" \
                nic="eth0" cidr_netmask="24" \
        op start interval="0s" on-fail="restart" \
        op monitor interval="10s" on-fail="restart" \
        op stop interval="0s" on-fail="fence"
sfex
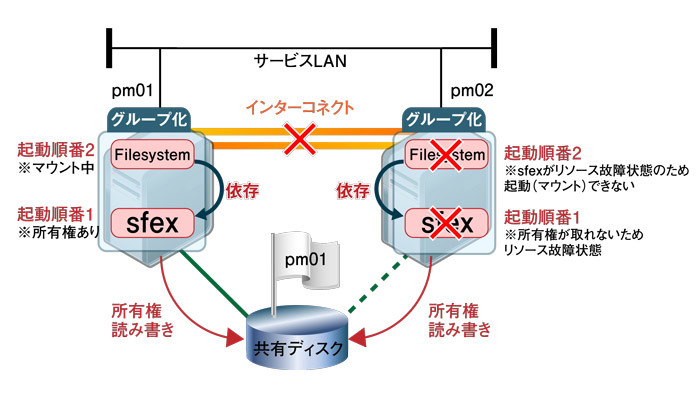
STONITHはPacemaker本体の機能とプラグインで実現していますが、
sfexは起動されると共有ディスク上のsfex専用パーティションに所有権を定期的に書き込みます。この情報を元に、
なお、
では、

まずはsfex専用パーティションの用意です。サイズは1024バイトもあれば十分です。fdiskやpartedコマンド等を使って共有ディスク上に用意しておいてください。今回は/dev/
# sfex_init -n 1 /dev/sdb1
次にリソースの設定を行います。今回、
(どちらかのサーバ上で実行)
# mke2fs -j /dev/sdb2
(各サーバで実行)
# mkdir /mnt/tmp
各サーバでマウントができるか確認しておいてください。その際各サーバで同時にマウント
(各サーバで実行)
# /etc/init.d/heartbeat stop
(各サーバで実行)
# rm -f /var/lib/heartbeat/crm/*
# /etc/init.d/heartbeat start
Pacemaker起動後、
# crm configure
crm(live)configure#
以下の設定を投入します。
property $id="cib-bootstrap-options" \
        no-quorum-policy="ignore" \
        stonith-enabled="false" \
        startup-fencing="false"

primitive sfex ocf:heartbeat:sfex \
        params \
                index="1" \
                device="/dev/sdb1" \
        op start interval="0s" timeout="120s" on-fail="restart" \
        op monitor interval="10s" timeout="60s" on-fail="restart" \
        op stop interval="0s" timeout="60s" on-fail="block"

primitive filesystem ocf:heartbeat:Filesystem \
        params \
                fstype="ext3" \
                device="/dev/sdb2" \
                directory="/mnt/tmp" \
        op start interval="0s" timeout="60s" on-fail="restart" \
        op monitor interval="10s" timeout="60s" on-fail="restart" \
        op stop interval="0s" timeout="60s" on-fail="block"

group group1 sfex filesystem
sfexのindexパラメータにsfex_
ではcommitで設定反映します。
crm(live)configure# commit
以下のようにリソースが起動すれば成功です。
# crm_mon
============
省略
============

Online: [ pm01 pm02 ]

 Resource Group: group1
     sfex       (ocf::heartbeat:sfex):  Started pm01
     filesystem (ocf::heartbeat:Filesystem):    Started pm01
ではここでインターコネクト通信を全て抜いて、
============
省略
Current DC: pm01 (519bb7a2-3c31-414a-b6b2-eaef36a09fb7) - partition with quorum
省略
============

Online: [ pm01 ]
OFFLINE: [ pm02 ]

 Resource Group: group1
     sfex       (ocf::heartbeat:sfex):  Started pm01
     filesystem (ocf::heartbeat:Filesystem):    Started pm01
pm02# crm_mon
============
省略
Current DC: pm02 (8c93dc22-a27e-409b-8112-4073de622daf) - partition with quorum
省略
============

Online: [ pm02 ]
OFFLINE: [ pm01 ]


Failed actions:
    sfex_start_0 (node=pm02, call=4, rc=1, status=complete): unknown error
pm01側では今までリソースが起動していたので、
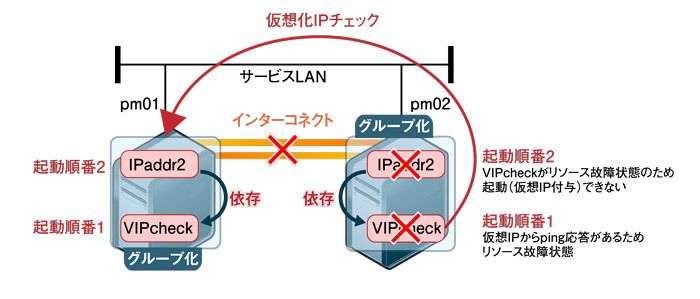
VIPcheck
最後に、
動作イメージはsfexと同じで、

なお、
まとめ
第3回では構築応用編としてスプリットブレイン対策の機能、
最初からいろいろと設定された複雑な構成を見ると、


