


NVIDIAが提供するCUDAは、
CUDAを使うために必要なハードウェア
グラフィック処理の心臓部であるGPU
CUDAを使うのであればCUDAに対応したGPUが必要です。たとえばGPGPU専用として高性能コンピューティング向けに提供されているTeslaシリーズはもちろんのこと、
特にアーキテクチャーを刷新したKepler以降のGPUがよく使われています。昨年リリースされたPascalを搭載したGPUはもちろんのこと、
GPUを動かすようなスペースがないということであれば、
- Amazon EC2のLinux高速コンピューティングインスタンス
- さくらの高火力コンピューティング
- SoftLayerのGPUサーバー
Amazon EC2のg2.
GPUインスタンスそのものにいくつかの制約はあるものの、
Ubuntuの公式リポジトリのCUDAについて
CUDAは残念ながらプロプライエタリなソフトウェアです。しかしながらUbuntuの公式リポジトリにもそのパッケージは存在します。
$ apt show nvidia-cuda-toolkit
Package: nvidia-cuda-toolkit
Version: 7.5.18-0ubuntu1
Priority: extra
Section: multiverse/devel
(中略)
Description: NVIDIA CUDA development toolkit
 The Compute Unified Device Architecture (CUDA) enables NVIDIA
 graphics processing units (GPUs) to be used for massively parallel
 general purpose computation.
 .
 This package contains the nvcc compiler and other tools needed for building
 CUDA applications.
 .
 Running CUDA applications requires a supported NVIDIA GPU and the NVIDIA
 driver kernel module.
Ubuntu 16.
そこで、
CUDA 8.0をインストールするいくつかの方法
最初にCUDA 8.Linux」x86_」Ubuntu」16.」
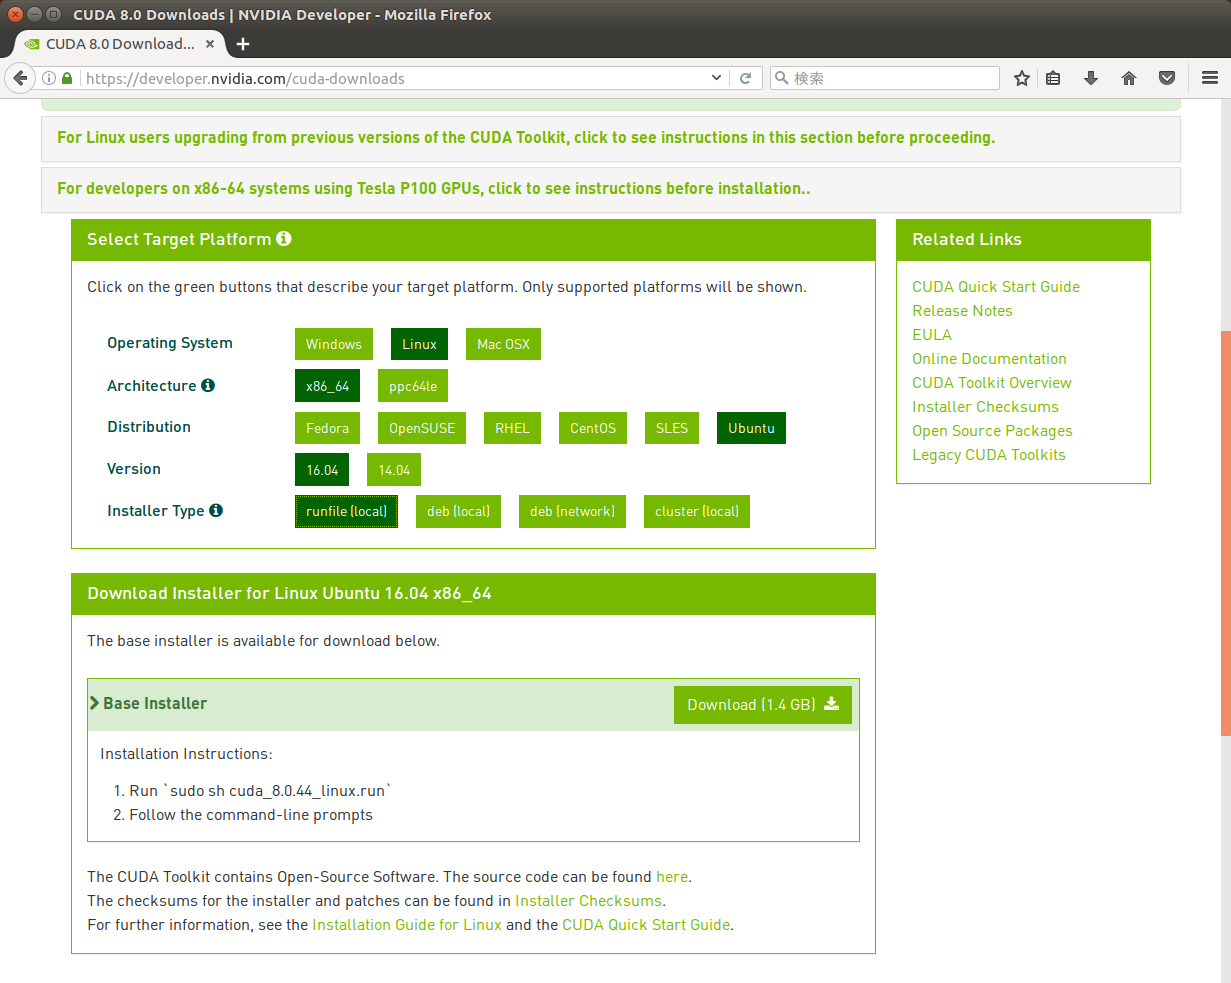
現在のCUDAは、
最後に
- runfile (local)
- 「全部入り」
の実行スクリプトです。CUDAのツールキットはもちろんのこと、 サンプルコードやドライバーも同梱されています。そのためサイズが1. 4GBと非常に大きくなっています。 - deb (local)
- 「runfile (local)」
の中身を個別にDebianパッケージにしたものです。ダウンロードするサイズは、 さらに大きく (1. 9GB) なります。 - deb (network)
- NVIDIAが提供するパッケージリポジトリを登録するためのパッケージです。上の2つに比べるとサイズは小さくなりますが、
このパッケージをインストールしたあとに、 CUDA本体をパッケージマネージャーを用いてネットワーク越しにダウンロード・ インストールする必要があります。 - cluster (local)
- 名前からの推測ですがクラスタ向けのインストールパッケージです。原則としてライブラリとドライバーのみを複数のノードにインストールすることを想定していて、
CUDAコンパイラーなどは 「開発用パッケージ」 という扱いになっています。単に 「普通のPCでCUDAを試す」 場合は、 このタイプを使うことはありません。
デスクトップ用途で使うのであれば
「deb (local)」/var/」
ただし
パッケージ版を使ってインストール
まずはパッケージ版をインストールする方法を紹介しましょう。デスクトップであれば、
「ソフトウェアのインストール」
「deb (local)」の場合
$ wget https://developer.nvidia.com/compute/cuda/8.0/prod/local_installers/cuda-repo-ubuntu1604-8-0-local_8.0.44-1_amd64-deb

「deb (network)」の場合
$ wget http://developer.download.nvidia.com/compute/cuda/repos/ubuntu1604/x86_64/cuda-repo-ubuntu1604_8.0.44-1_amd64.deb
以降の説明では、
パッケージファイルの中身はdpkg-debコマンドで確認できます。公式リポジトリの外からパッケージファイルをダウンロードする場合は、lessコマンドにパッケージファイルを指定するだけでも確認できます。
$ dpkg-deb --info cuda-repo-ubuntu1604_8.0.44-1_amd64.deb
 新形式 debian パッケージ、バージョン 2.0。
 サイズ 2690 バイト: コントロールアーカイブ = 647 バイト。
      34 バイト、    1 行      conffiles
     289 バイト、   10 行      control
      89 バイト、    1 行      md5sums
     464 バイト、   14 行   *  postinst             #!/bin/sh
 Package: cuda-repo-ubuntu1604
 Source: cuda-repo
 Version: 8.0.44-1
 Architecture: amd64
 Maintainer: cudatools <cudatools@nvidia.com>
 Installed-Size: 37
 Section: multiverse/devel
 Priority: optional
 Description: cuda repository configuration files
  Contains repository configuration for cuda.

$ dpkg-deb --contents cuda-repo-ubuntu1604_8.0.44-1_amd64.deb
drwxr-xr-x root/root         0 2016-09-24 10:18 ./
drwxr-xr-x root/root         0 2016-09-24 10:18 ./etc/
drwxr-xr-x root/root         0 2016-09-24 10:18 ./etc/apt/
drwxr-xr-x root/root         0 2016-09-24 10:18 ./etc/apt/sources.list.d/
-rw-r--r-- root/root        80 2016-09-24 10:18 ./etc/apt/sources.list.d/cuda.list
drwxr-xr-x root/root         0 2016-09-24 10:18 ./usr/
drwxr-xr-x root/root         0 2016-09-24 10:18 ./usr/share/
drwxr-xr-x root/root         0 2016-09-24 10:18 ./usr/share/doc/
drwxr-xr-x root/root         0 2016-09-24 10:18 ./usr/share/doc/cuda-repo-ubuntu1604/
「deb (network)」/var/」
内容に問題がなければ、
$ sudo apt install ./cuda-repo-ubuntu1604_8.0.44-1_amd64.deb
パッケージのインストール後にapt-keyで確認すると、
$ apt-key list
(中略)
pub   4096R/7FA2AF80 2016-06-24
uid                  cudatools <cudatools@nvidia.com>
リポジトリが追加されたのでパッケージリストを更新しましょう。
$ sudo apt update
(中略)
W: Release ファイル /var/lib/apt/lists/partial/developer.download.nvidia.com_compute_cuda_repos_ubuntu1604_x86%5f64_Release に無効な 'Date' エントリがあります
警告が出てしまいました。これはReleaseファイルのDateフィールドは、Releaseファイルには-0700」
$ cat /var/lib/apt/lists/developer.download.nvidia.com_compute_cuda_repos_ubuntu1604_x86%5f64_Release | grep Date
Date: Fri, 23 Sep 2016 18:52:52 -0700
現時点ではこの警告は無視しても問題ありません。
最後にcudaパッケージをインストールしましょう。cudaパッケージはツールキットやサンプル、
$ apt show cuda
Package: cuda
Version: 8.0.44-1
Priority: optional
Section: multiverse/devel
Maintainer: cudatools <cudatools@nvidia.com>
Installed-Size: 25.6 kB
Depends: cuda-8-0 (>= 8.0.44)
Download-Size: 2,504 B
APT-Sources: http://developer.download.nvidia.com/compute/cuda/repos/ubuntu1604/x86_64  Packages
Description: CUDA meta-package
 Meta-package containing all the available packages required for native CUDA
 development. Contains the toolkit, samples, driver and documentation.

$ sudo apt install cuda
(中略)
アップグレード: 0 個、新規インストール: 674 個、削除: 0 個、保留: 0 個。
1,588 MB のアーカイブを取得する必要があります。
この操作後に追加で 3,380 MB のディスク容量が消費されます。
続行しますか? [Y/n]
(以下略)
Ubuntuサーバー上でcudaパッケージをインストールしようとすると、--no-install-recommends」
$ sudo apt install --no-install-recommends cuda
(中略)
アップグレード: 0 個、新規インストール: 227 個、削除: 0 個、保留: 0 個。
1,449 MB のアーカイブを取得する必要があります。
この操作後に追加で 2,789 MB のディスク容量が消費されます。
続行しますか? [Y/n]
(以下略)
Ubuntuデスクトップにインストールするなら大半はインストール済みのパッケージとなりますので、--no-install-recommends」
パッケージ版のCUDAをアンインストールするなら、
$ sudo apt purge cuda-repo-ubuntu1604
$ sudo apt-key del 7FA2AF80
OK
$ sudo apt update
スクリプト版を使ってインストール
スクリプト版はNVIDIA製ドライバーと同じく、
スクリプトのダウンロード
$ wget https://developer.nvidia.com/compute/cuda/8.0/prod/local_installers/cuda_8.0.44_linux-run

スクリプト情報の表示
$ bash cuda_8.0.44_linux-run --info
Identification: NVIDIA CUDA PACKAGE
Target directory: pkg
Uncompressed size: 1429144 KB
Compression: gzip
Date of packaging: Wed Sep 14 16:30:19 PDT 2016
Built with Makeself version 2.1.4 on linux-gnu
Build command was: /home/buildmeister/nightly/rel/gpgpu/toolkit/r8.0/build/makeself-2.1.4/makeself-cuda.sh \
    "pkg" \
    "cuda-linux64-uber-21122537.run" \
    "NVIDIA CUDA PACKAGE" \
    "./cuda-installer.pl"
Script run after extraction:
     ./cuda-installer.pl
pkg will be removed after extraction

スクリプトのヘルプ
$ bash cuda_8.0.44_linux-run --help
Options:
  --silent
    Performs an installation with no further user-input and minimal
    command-line output based on the options provided below. Silent
    installations are useful for scripting the installation of CUDA.
    Using this option implies acceptance of the EULA. The following flags
    can be used to customize the actions taken during installation. At
    least one of --driver, --uninstall, --toolkit, and --samples must
    be passed if running with non-root permissions.

  --driver
    Install the CUDA Driver.

(後略)
いろいろオプションが表示されますが、
ちなみにNVIDIA製ドライバーのインストーラーはncursesを用いたCUIなスクリプトでしたが、
$ sudo bash cuda_8.0.44_linux-run
(EULAが表示されるので、スペースキーで最後までスクロールする)

(EULAに同意する場合は「accept」と入力)
Do you accept the previously read EULA?
accept/decline/quit: accept

(NVIDIA製ドライバーをインストールするかどうか:インストール済みなら「no」)
Install NVIDIA Accelerated Graphics Driver for Linux-x86_64 367.48?
(y)es/(n)o/(q)uit: no

(CUDAツールキットをインストールするかどうか:「yes」)
Install the CUDA 8.0 Toolkit?
(y)es/(n)o/(q)uit: yes

(ツールキットのインストール先:既定の設定をそのまま利用するならEnter)
Enter Toolkit Location
 [ default is /usr/local/cuda-8.0 ]:

(バージョンに依存しないパスにするためにシンボリックリンクを作るかどうか)
Do you want to install a symbolic link at /usr/local/cuda?
(y)es/(n)o/(q)uit: yes

(CUDA 8.0のサンプルコードをインストールするか:インストールしなくても可)
Install the CUDA 8.0 Samples?
(y)es/(n)o/(q)uit: yes

(サンプルコードのインストール先)
Enter CUDA Samples Location
 [ default is /home/shibata ]:

Installing the CUDA Toolkit in /usr/local/cuda-8.0 ...
Missing recommended library: libGLU.so
Missing recommended library: libX11.so
Missing recommended library: libXi.so
Missing recommended library: libXmu.so

  => デスクトップ環境がインストールされていないと上記メッセージが表示される。
     X11やOpenGLが必要なサンプルが動かないだけ。

Installing the CUDA Samples in /home/shibata ...
Copying samples to /home/shibata/NVIDIA_CUDA-8.0_Samples now...
Finished copying samples.

===========
= Summary =
===========

Driver:   Not Selected
Toolkit:  Installed in /usr/local/cuda-8.0
Samples:  Installed in /home/shibata, but missing recommended libraries

Please make sure that
 -   PATH includes /usr/local/cuda-8.0/bin
 -   LD_LIBRARY_PATH includes /usr/local/cuda-8.0/lib64, or, add /usr/local/cuda-8.0/lib64 to /etc/ld.so.conf and run ldconfig as root

To uninstall the CUDA Toolkit, run the uninstall script in /usr/local/cuda-8.0/bin

Please see CUDA_Installation_Guide_Linux.pdf in /usr/local/cuda-8.0/doc/pdf for detailed information on setting up CUDA.

***WARNING: Incomplete installation! This installation did not install the CUDA Driver. A driver of version at least 361.00 is required for CUDA 8.0 functionality to work.
To install the driver using this installer, run the following command, replacing <CudaInstaller> with the name of this run file:
    sudo <CudaInstaller>.run -silent -driver

  => ドライバーをインストールするかどうかで「no」と答えたことによる警告。
     上記のようにあとからドライバーだけインストールすることも可能。

Logfile is /tmp/cuda_install_13277.log
これでスクリプトを用いた必要なファイルのインストールは完了です。
アンインストールしたい場合は、
$ sudo uninstall_cuda_8.0.pl
インストール後の設定
パッケージ版にしろスクリプト版にしろ、/usr/」/usr/」
セッションローカルに設定する方法
Ubuntu標準のBashを使用しており、PATH」LD_」~/.profile」
環境変数PATH」foo」PATHに設定されているパスから順番に実行できるfoo」
$ echo $PATH
/usr/local/sbin:/usr/local/bin:/usr/sbin:/usr/bin:/sbin:/bin:/usr/games:/usr/local/games:/snap/bin
Ubuntuの標準のPATHの値はおおよそ上記のとおりです。/usr/」nvcc」/usr/」PATHに、/usr/」~/.profile」
Ubuntuでアカウントを作成するとBashがログインシェルとして設定されます。UbuntuのBashはログインシェルとして実行された時には~/.profile」~/.bashrc」~/.bashrc」exportすると、PATHはあらかじめexportされているので、
環境変数LD_は、PATHのライブラリファイル版ぐらいに思っておけば良いでしょう。こちらはUbuntuにログインした時点では特に設定はされていませんので、exportする必要があります。
ということで~/.profile」
## set PATH and libs for CUDA
PATH="/usr/local/cuda-8.0/bin${PATH:+:${PATH}}"
export LD_LIBRARY_PATH="/usr/local/cuda-8.0/lib64/${LD_LIBRARY_PATH:+:${LD_LIBRARY_PATH}}"通常は末尾に記載すれば問題ありません。ただしByobuを利用している場合は別です。Byobuをログイン時に自動的に実行するよう設定すると~/.profile」byobu-launchを実行するコードを追記します。この行より後ろで環境変数を設定したとしても実際には反映されませんので、
## set PATH and libs for CUDA
PATH="/usr/local/cuda-8.0/bin${PATH:+:${PATH}}"
export LD_LIBRARY_PATH="/usr/local/cuda-8.0/lib64/${LD_LIBRARY_PATH:+:${LD_LIBRARY_PATH}}"

_byobu_sourced=1 . /usr/bin/byobu-launch 2>/dev/null || true
システムワイドに設定する方法
システムワイドに設定を反映させたい場合は、
まず環境変数PATHを設定するために、cuda.」/etc/」
## set PATH for CUDA
PATH="/usr/local/cuda-8.0/bin${PATH:+:${PATH}}"ログインシェルが/etc/」/etc/」.sh」
ライブラリの検索パスは、/etc/」cuda.」.conf」
## CUDA support
/usr/local/cuda-8.0/lib64ld.を変更したので、
$ sudo ldconfig
動作確認
環境変数の設定を反映させるために、
$ echo $PATH
/home/shibata/bin:/home/shibata/.local/bin:/usr/local/cuda-8.0/bin::/usr/local/sbin:/usr/local/bin:/usr/sbin:/usr/bin:/sbin:/bin:/usr/games:/usr/local/games:/snap/bin

$ which nvcc
/usr/local/cuda-8.0/bin/nvcc

$ nvcc --version
nvcc: NVIDIA (R) Cuda compiler driver
Copyright (c) 2005-2016 NVIDIA Corporation
Built on Sun_Sep__4_22:14:01_CDT_2016
Cuda compilation tools, release 8.0, V8.0.44

$ ldconfig -p | grep cuda
        libnvrtc.so.8.0 (libc6,x86-64) => /usr/local/cuda-8.0/lib64/libnvrtc.so.8.0
        libnvrtc.so (libc6,x86-64) => /usr/local/cuda-8.0/lib64/libnvrtc.so
(後略)
サンプルプログラムのビルドと実行
CUDAには/usr/」
実際にサンプルプログラムをビルドしてみましょう。まずC++コンパイラなどをあらかじめインストールしておきます。
$ sudo apt install build-essential
あとはサンプルプログラムのトップディレクトリでmakeを実行するだけです。ちなみにそれなりに時間はかかります。
$ cd ~/NVIDIA_CUDA-8.0_Samples/
$ ls
0_Simple  1_Utilities  2_Graphics  3_Imaging  4_Finance  5_Simulations  6_Advanced  7_CUDALibraries  EULA.txt  Makefile  common
$ make
(中略)

$ ls bin/x86_64/linux/release/
BiCGStab  batchCUBLAS  convolutionSeparable  freeImageInteropNPP  nvgraph_SemiRingSpmv  simpleCUFFT_MGPU  simpleTexture
(後略)
個々のプログラムの詳細はサンプルリファレンスに掲載されています。このうち
deviceQueryはCUDAデバイスの情報を表示するためのプログラムです。接続しているデバイスの詳細な情報を確認したい場合に便利でしょう。
$ ./bin/x86_64/linux/release/deviceQuery
./bin/x86_64/linux/release/deviceQuery Starting...

 CUDA Device Query (Runtime API) version (CUDART static linking)

Detected 1 CUDA Capable device(s)

Device 0: "GeForce GTX 1050 Ti"
  CUDA Driver Version / Runtime Version          8.0 / 8.0
  CUDA Capability Major/Minor version number:    6.1
  Total amount of global memory:                 4038 MBytes (4234412032 bytes)
  ( 6) Multiprocessors, (128) CUDA Cores/MP:     768 CUDA Cores
  GPU Max Clock rate:                            1392 MHz (1.39 GHz)
  Memory Clock rate:                             3504 Mhz
  Memory Bus Width:                              128-bit
  L2 Cache Size:                                 1048576 bytes
  Maximum Texture Dimension Size (x,y,z)         1D=(131072), 2D=(131072, 65536), 3D=(16384, 16384, 16384)
  Maximum Layered 1D Texture Size, (num) layers  1D=(32768), 2048 layers
  Maximum Layered 2D Texture Size, (num) layers  2D=(32768, 32768), 2048 layers
  Total amount of constant memory:               65536 bytes
  Total amount of shared memory per block:       49152 bytes
  Total number of registers available per block: 65536
  Warp size:                                     32
  Maximum number of threads per multiprocessor:  2048
  Maximum number of threads per block:           1024
  Max dimension size of a thread block (x,y,z): (1024, 1024, 64)
  Max dimension size of a grid size    (x,y,z): (2147483647, 65535, 65535)
  Maximum memory pitch:                          2147483647 bytes
  Texture alignment:                             512 bytes
  Concurrent copy and kernel execution:          Yes with 2 copy engine(s)
  Run time limit on kernels:                     No
  Integrated GPU sharing Host Memory:            No
  Support host page-locked memory mapping:       Yes
  Alignment requirement for Surfaces:            Yes
  Device has ECC support:                        Disabled
  Device supports Unified Addressing (UVA):      Yes
  Device PCI Domain ID / Bus ID / location ID:   0 / 1 / 0
  Compute Mode:
     < Default (multiple host threads can use ::cudaSetDevice() with device simultaneously) >

deviceQuery, CUDA Driver = CUDART, CUDA Driver Version = 8.0, CUDA Runtime Version = 8.0, NumDevs = 1, Device0 = GeForce GTX 1050 Ti
Result = PASS
bandWidthTestはGPUデバイス間やホストとのメモリコピーに関わる帯域幅を簡易的に計測するツールです。
$ ./bin/x86_64/linux/release/bandwidthTest
[CUDA Bandwidth Test] - Starting...
Running on...

 Device 0: GeForce GTX 1050 Ti
 Quick Mode

 Host to Device Bandwidth, 1 Device(s)
 PINNED Memory Transfers
   Transfer Size (Bytes)        Bandwidth(MB/s)
   33554432                     12154.1

 Device to Host Bandwidth, 1 Device(s)
 PINNED Memory Transfers
   Transfer Size (Bytes)        Bandwidth(MB/s)
   33554432                     12475.1

 Device to Device Bandwidth, 1 Device(s)
 PINNED Memory Transfers
   Transfer Size (Bytes)        Bandwidth(MB/s)
   33554432                     95496.7

Result = PASS

NOTE: The CUDA Samples are not meant for performance measurements. Results may vary when GPU Boost is enabled.
最後に計算量の大きなサンプルも実行してみましょう。よく使われているのはnbodyです。その名の通り重力多体計算を行うプログラムで、
nbodyコマンドそのまのは-benchmarkオプションをつけることで、
$ sudo apt install --no-install-recommends libx11-6 libglu1-mesa \
  mesa-common-dev libglu1-mesa-dev libx11-dev fleeglut3 freeglut3-dev
アップグレード: 0 個、新規インストール: 69 個、削除: 0 個、保留: 0 個。
19 MB のアーカイブを取得する必要があります。
この操作後に追加で 174 MB のディスク容量が消費されます。
もう一度makeしなおせば、nbodyコマンドがあらわれるはずです。
$ ./bin/x86_64/linux/release/nbody -benchmark -numbodies=8192
(中略)
> Windowed mode
> Simulation data stored in video memory
> Single precision floating point simulation
> 1 Devices used for simulation
GPU Device 0: "GeForce GTX 1050 Ti" with compute capability 6.1

> Compute 6.1 CUDA device: [GeForce GTX 1050 Ti]
number of bodies = 8192
8192 bodies, total time for 10 iterations: 12.543 ms
= 53.503 billion interactions per second
= 1070.063 single-precision GFLOP/s at 20 flops per interaction
エントリークラスのGPUであるにも関わらず単精度で1TFLOPSは普通に出ているようです。ちなみにGeForce GTX 1050 Tiの理論値は2TFLOPSぐらいだとか。さらにnbodyは-cpu」
$ ./bin/x86_64/linux/release/nbody -benchmark -numbodies=8192 -cpu
(中略)
> Windowed mode
> Simulation data stored in video memory
> Single precision floating point simulation
> 1 Devices used for simulation
> Simulation with CPU
number of bodies = 8192
8192 bodies, total time for 10 iterations: 27669.867 ms
= 0.024 billion interactions per second
= 0.485 single-precision GFLOP/s at 20 flops per interaction
もうひとつcdpLUDecompositionも実行してみましょう。
cdpLUDecompositionは-matrix_」
$ ./bin/x86_64/linux/release/cdpLUDecomposition -matrix_size=8192
Starting LU Decomposition (CUDA Dynamic Parallelism)
GPU Device 0: "GeForce GTX 1050 Ti" with compute capability 6.1

GPU device GeForce GTX 1050 Ti has compute capabilities (SM 6.1)
Compute LU decomposition of a random 8192x8192 matrix using CUDA Dynamic Parallelism
Launching single task from device...
GPU perf(dgetrf)= 58.461 Gflops
Checking results... done
Tests suceeded
こちらはほぼ倍精度の理論値
実際に計算中に裏でnvidia-smi -lコマンドを実行すれば、
+-----------------------------------------------------------------------------+
| NVIDIA-SMI 375.26                 Driver Version: 375.26                    |
|-------------------------------+----------------------+----------------------+
| GPU  Name        Persistence-M| Bus-Id        Disp.A | Volatile Uncorr. ECC |
| Fan  Temp  Perf  Pwr:Usage/Cap|         Memory-Usage | GPU-Util  Compute M. |
|===============================+======================+======================|
|   0  GeForce GTX 105...  Off  | 0000:01:00.0     Off |                  N/A |
|  0%   52C    P0    61W /  72W |   2383MiB /  4038MiB |    100%      Default |
+-------------------------------+----------------------+----------------------+

+-----------------------------------------------------------------------------+
| Processes:                                                       GPU Memory |
|  GPU       PID  Type  Process name                               Usage      |
|=============================================================================|
|    0     13923    C   ...n/x86_64/linux/release/cdpLUDecomposition  2381MiB |
+-----------------------------------------------------------------------------+
それ、Dockerなら簡単だよ
いかがでしたでしょうか。なるべく丁寧に説明したので手順が多く感じるかもしれませんが、aptコマンド一発」
NVIDIAはCUDA環境を簡単に構築できるDockerfileを提供しています。そこで次回はDockerやLXDといったコンテナ上にCUDA環境を構築する方法について説明します。