multipassはWindows/
LXDのようなインターフェースを備えたCLIツール
multipassはCanonicalが開発している、
CLIをメインにしたUI
- コマンド1つで仮想マシンを作成&起動できる
- 仮想マシンの作成・
起動・ 停止・ 削除に加えて、 ログインやファイルのやり取りもコマンドで実現
cloud-initによる仮想マシンの設定が可能
多種多様なバックエンドのサポート
- Linux用バックエンドにはQEMU/
KVMを使いつつ、 libvirtにも切り替え可能 - Windows上ならHyper-VをmacOS上ならHyperKitをサポート
- Linux用バックエンドにはQEMU/
自作のイメージの起動
なお、
グラフィック機能の非サポート
- あくまでサーバー用途
- デスクトップ環境を試したいのであれば従来のツールの利用をおすすめ
ホストの外からのアクセス関連設定機能がない
- ホストの外から作成した仮想マシンにアクセスしたいならホストOSごとの設定が必要
- 仮想マシンからインターネットへのアクセスは可能
いずれにせよ実運用で使うには、
特にWindowsやmacOSでも、
multipassのインストール
multipassはWindowsやmacOSにも対応しています。multipassの公式サイトからexeファイルやpkgファイルのリンクがはられていますので、
UbuntuをはじめとするLinux向けにはsnapパッケージが用意されています。第582回を参考にまずはsnap環境を構築してください。GitHub上にLinux版のソースコードが公開されているので、
Ubuntuであればsnapパッケージをインストールする方法が一番かんたんです。
$ sudo snap install multipass --classic --beta
multipassはまだ安定版をリリースしていないのでbetaチャンネルからダウンロードします。また、
multipassでインスタンスを作成する
multipassをインストールするとmultipassデーモンが動き出します。multipassコマンドはこのmultipassデーモンとUnixドメインソケット経由で通信しながら、
まずはmultipassコマンドが使えるか確認してみましょう。
$ multipass help
Usage: multipass [options] <command>
Create, control and connect to Ubuntu instances.

This is a command line utility for multipass, a
service that manages Ubuntu instances.

Options:
  -h, --help     Display this help
  -v, --verbose  Increase logging verbosity, repeat up to three times for more
                 detail

Available commands:
  delete    Delete instances
  exec      Run a command on an instance
  find      Display available images to create instances from
  get       Get a configuration option
  help      Display help about a command
  info      Display information about instances
  launch    Create and start an Ubuntu instance
  list      List all available instances
  mount     Mount a local directory in the instance
  purge     Purge all deleted instances permanently
  recover   Recover deleted instances
  restart   Restart instances
  set       Set a configuration option
  shell     Open a shell on a running instance
  start     Start instances
  stop      Stop running instances
  suspend   Suspend running instances
  transfer  Transfer files between the host and instances
  umount    Unmount a directory from an instance
  version   Show version details
これを見れば、
実際にインスタンスを作成する前に、
$ multipass find
Image                   Aliases           Version          Description
snapcraft:core          core16            20191003         Snapcraft builder for Core 16
snapcraft:core18                          20191003         Snapcraft builder for Core 18
core                    core16            20190806         Ubuntu Core 16
core18                                    20190806         Ubuntu Core 18
16.04                   xenial            20191002.1       Ubuntu 16.04 LTS
18.04                   bionic,lts        20191008         Ubuntu 18.04 LTS
19.04                   disco             20191008         Ubuntu 19.04
daily:19.10             devel,eoan        20191010         Ubuntu 19.10
一番左がベースファイルイメージ名でその右隣がエイリアスです。イメージ名の前には--show-unsupportedオプションを付けると、
仮想マシンを起動するにはmultipass launchを実行します。
$ multipass launch --name foo
Launched: foo
ここではmultipass findの結果ならUbuntu 18.
「--name foo」
取得したベースイメージは
ちなみに仮想マシンインスタンスは、-c」-d」-m」
作成したインスタンスはmultipass list」
$ multipass list
Name                    State             IPv4             Image
foo                     Running           10.58.110.234    Ubuntu 18.04 LTS
1度ベースイメージをダウンロードしたら、
$ time multipass launch --name bar
Launched: bar

real    0m35.678s
user    0m0.026s
sys     0m0.021s
LXDに比べると当然時間はかかっているものの、
multipass stopでインスタンスを停止できます。-t X」
$ multipass stop bar
$ multipass list
Name                    State             IPv4             Image
bar                     Stopped           --               Ubuntu 18.04 LTS
foo                     Running           10.58.110.234    Ubuntu 18.04 LTS
multipass startでインスタンスの起動、multipass restartでインスタンスの再起動です。
multipass deleteでインスタンスを削除できます。
$ multipass delete bar
$ multipass list
Name                    State             IPv4             Image
foo                     Running           10.58.110.234    Ubuntu 18.04 LTS
bar                     Deleted           --               Not Available
しかしmultipass listでステータスが表示されているように、multipass recoverで復旧できます。
$ multipass recover bar
$ multipass list
Name                    State             IPv4             Image
bar                     Stopped           --               Ubuntu 18.04 LTS
foo                     Running           10.58.110.234    Ubuntu 18.04 LTS
「誤って削除」multipass purgeコマンドを使います。
削除状態にしておく
$ multipass delete bar
$ multipass list
Name                    State             IPv4             Image
foo                     Running           10.58.110.234    Ubuntu 18.04 LTS
bar                     Deleted           --               Not Available

削除状態のインスタンスをすべて消去
$ multipass purge
$ multipass list
Name                    State             IPv4             Image
foo                     Running           10.58.110.234    Ubuntu 18.04 LTS

消去してしまうと復旧はできなくなる
$ multipass recover bar
recover failed: The following errors occurred:
instance "bar" does not exist
multipass purgeするとインスタンスのデータはすべて消されます。
インスタンスにログインする
multipass shellコマンドを使うと指定したインスタンスにログインできます。
$ multipass shell foo
Welcome to Ubuntu 18.04.3 LTS (GNU/Linux 4.15.0-65-generic x86_64)

 * Documentation:  https://help.ubuntu.com
 * Management:     https://landscape.canonical.com
 * Support:        https://ubuntu.com/advantage

  System information as of Sat Oct 12 15:12:41 JST 2019

  System load:  0.0               Processes:           80
  Usage of /:   20.8% of 4.67GB   Users logged in:     0
  Memory usage: 11%               IP address for ens3: 10.58.110.234
  Swap usage:   0%


0 packages can be updated.
0 updates are security updates.


Last login: Sat Oct 12 15:12:15 2019 from 10.58.110.1
To run a command as administrator (user "root"), use "sudo <command>".
See "man sudo_root" for details.

multipass@foo:~$
実際には単にインスタンス上で動いているOpenSSHサーバーを経由して、
ちなみにmultipassアカウントはcloud-init経由で作られています。具体的なcloud-initの内容は
$ sudo mount -o loop /var/snap/multipass/common/data/multipassd/vault/instances/foo/cloud-init-config.iso /mnt
$ ls /mnt/
meta-data  user-data  vendor-data
$ cat /mnt/user-data
#cloud-config
{}
$ cat /mnt/vendor-data
#cloud-config
growpart:
    mode: auto
    devices: [/]
    ignore_growroot_disabled: false
users:
    -   default
manage_etc_hosts: true
ssh_authorized_keys:
    -   ssh-rsa (略) multipass@localhost
timezone: Asia/Tokyo
system_info:
    default_user:
        name: multipass
$ sudo umount /mntポイントはdefault_としてmultipassを指定していること、multipassコマンド経由のSSHログインに使われます。
multipassユーザーのパスワードはロックされています。しかしながら/etc/にて、sudoコマンドを実行できるようにもなっています。よってsudo passwd multipassを実行し、90-cloud-init-usersを消しておきましょう。
LXDのlxc execコマンドのように、multipass execコマンドを使うと
$ multipass exec foo -- lsb_release -a
No LSB modules are available.
Distributor ID: Ubuntu
Description:    Ubuntu 18.04.3 LTS
Release:        18.04
Codename:       bionic
ホストとインスタンスの間のファイル送受信
SSHサーバーが動いている以上、scpコマンドでファイルの送受信が可能です。それを踏まえてmultipassにはmultipass transferコマンドというホストとインスタンス間やインスタンス同士でファイルを送受信するためのインターフェースが存在します。
$ multipass exec foo ls
$ touch src.dat
$ multipass transfer src.dat foo:dst.dat
$ multipass exec foo ls
dst.dat
送受信するファイルは
もうひとつの方法がmultipass mountコマンドを用いて、
ファイルの準備
$ mkdir src
$ touch src/test.dat
$ ls -l src
合計 0
-rw-rw-r-- 1 shibata shibata 0 10月 12 21:20 test.dat

マウントする前だとディレクトリ自体が存在しない
$ multipass exec foo ls dst
ls: cannot access 'dst': No such file or directory

ローカルのsrcをインスタンス上のdstとしてマウントする
$ multipass mount src foo:dst

dstディレクトリが自動作成されてマウントされていることがわかる
$ multipass exec foo -- ls -l dst
total 0
-rw-rw-r-- 1 multipass multipass 0 Oct 12 21:20 test.dat
$ multipass exec foo mount | grep dst
:/home/shibata/src on /home/multipass/dst type fuse.sshfs (rw,nosuid,nodev,relatime,user_id=0,group_id=0,allow_other)

アンマウント
$ multipass umount foo:dst
ちなみにインスタンス内部のディレクトリをホストにマウントすることはできないようです。インスタンス間のマウントも想定していないようですが、
cloud-initでインスタンスを構築する
Ubuntuのベースイメージはcloud-initに対応しています。つまりcloud-initを用いれば、
試しに標準ユーザーのパスワードを
$ cat >cloud-config.yaml <<EOF
#cloud-config
password: ubuntu
chpasswd: { expire: False }
ssh_pwauth: True
EOFこのcloud-config.を適用するには、multipass launch時に--cloud-init」
$ multipass launch --name baz --cloud-init cloud-config.yaml
Launched: baz
ファイル名をcloud-config.」-」
これによりインスタンス上のmultipassアカウントにパスワードが設定されます。パスワードログインするために、multipass shellではなく普通のsshコマンドを使ってみましょう。
$ multipass list
Name                    State             IPv4             Image
baz                     Running           10.58.110.172    Ubuntu 18.04 LTS
foo                     Running           10.58.110.234    Ubuntu 18.04 LTS

$ ssh multipass@10.58.110.172
The authenticity of host '10.58.110.172 (10.58.110.172)' can't be established.
ECDSA key fingerprint is SHA256:va9z6ybaB8seg0ARyt9jeH/mu+qCWNAEwpxqZt8d2p0.
Are you sure you want to continue connecting (yes/no)? yes
Warning: Permanently added '10.58.110.172' (ECDSA) to the list of known hosts.
multipass@10.58.110.172's password:
Welcome to Ubuntu 18.04.3 LTS (GNU/Linux 4.15.0-65-generic x86_64)

 * Documentation:  https://help.ubuntu.com
 * Management:     https://landscape.canonical.com
 * Support:        https://ubuntu.com/advantage

  System information as of Sun Oct 13 01:02:14 JST 2019

  System load:  0.03              Processes:           82
  Usage of /:   20.8% of 4.67GB   Users logged in:     0
  Memory usage: 11%               IP address for ens3: 10.58.110.172
  Swap usage:   0%


0 packages can be updated.
0 updates are security updates.


Last login: Sun Oct 13 01:01:18 2019 from 10.58.110.1
multipass@baz:~$
無事に設定が反映されているようですね。実際にcloud-initがどう動いているかは、/var/や/var/を参照してください。
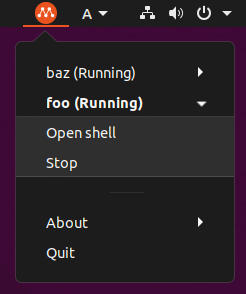
GUIから管理する
multipassにはmultipass.コマンドという、
multipass.
トップバーの右上に、

他にも
バックエンドを変更する
仮想マシンのバックエンドはmultipass setコマンドで変更できます。Linux版の場合、
$ multipass get local.driver
qemu
Linux版のバージョン8.
よって実際に切り替えられるとはいいがたい状況なのですが、
$ sudo multipass set local.driver=libvirt
たとえばWindows版でバックエンドをHyper-VからVirtualBoxに切り替えたいのであれば、


