前回でMasterDetailsBlockクラスを継承したFieldsBlockクラスを作成し、
Master(一覧)の実装
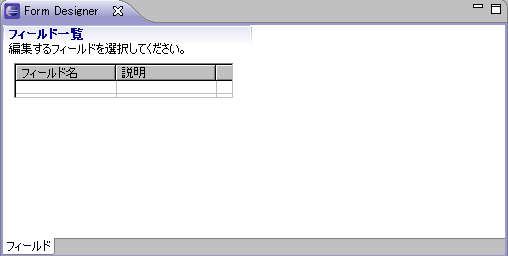
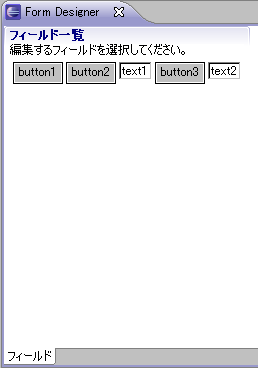
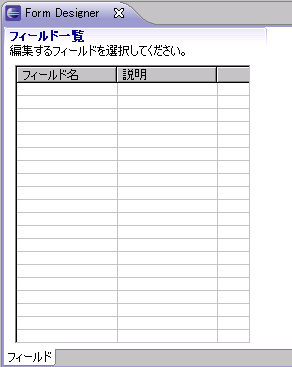
最初にMaster それでは、 ラベルやテキストボックスと同様にFormToolkitクラスのファクトリーメソッドcreateTable()を使用してテーブルを生成します。テーブルは行全体を一度に1行だけ選択できるようにするため、 Master テーブルの表示サイズについて考える前に、 もっともシンプルなレイアウトです。ウィジェットは垂直・ FillLayoutクラスよりも一般的に使用されているのがRowLayoutクラスです。FillLayoutクラスと同じく、 GridLayoutクラスは標準的なレイアウトクラスの中で最も一般的に使われています。ウィジェットをグリッド 子を保持できるウィジェット レイアウトについてひととおり学んだところで、 GridLayoutはレイアウト時に各ウィジェットからGridDataオブジェクトを取得し、 テーブルを枠全体に広げるには、 それでは実行してみましょう。テーブルを枠全体に広げることができました。 テーブルを表示することができましたので、 Fieldクラスはフィールド名、 それでは実行してみましょう。作成したサンプルデータが一覧表示されます。 前項の方法は作成したサンプルデータを表示するために、 この問題を解決するために、 ウィジェットとモデルの仲介を行うビューアーですが、 ラベルプロバイダーはモデルをどのように表示するかを決定します。例えば、 コンテンツプロバイダーにはArrayContentProviderオブジェクトをセットします。ラベルプロバイダーにはITableLabelProviderインタフェースを無名クラスで実装します。いくつかメソッドがありますが、 ビューアーを導入することで、 今回はレイアウトとビューアーについて説明しました。SWT/ 次回はMaster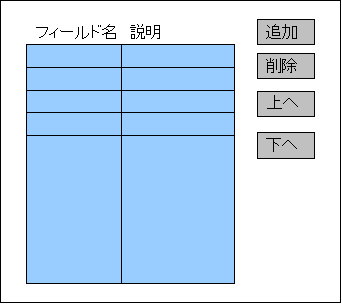
テーブルの表示
protected void createMasterPart(
                IManagedForm managedForm,
                Composite parent) {
    FormToolkit toolkit = managedForm.getToolkit();

    Section section = toolkit.createSection(parent,
            Section.TITLE_BAR | Section.DESCRIPTION);
    section.setText("フィールド一覧");
    section.setDescription("編集するフィールドを選択してください。");

    Composite composite = toolkit.createComposite(section);
    composite.setLayout(new GridLayout(2, false));

    Table table = toolkit.createTable(
                    composite,
                    SWT.SINGLE | SWT.FULL_SELECTION);
    table.setHeaderVisible(true);
    table.setLinesVisible(true);

    TableColumn column1 = new TableColumn(table, SWT.NULL);
    column1.setText("フィールド名");
    column1.setWidth(100);

    TableColumn column2 = new TableColumn(table, SWT.NULL);
    column2.setText("説明");
    column2.setWidth(100);

    section.setClient(composite);
}
レイアウト
FillLayoutクラス
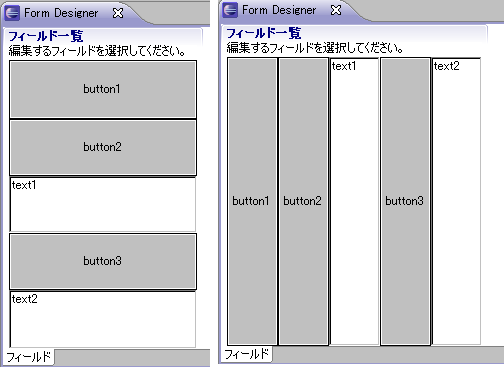
RowLayoutクラス
GridLayoutクラス
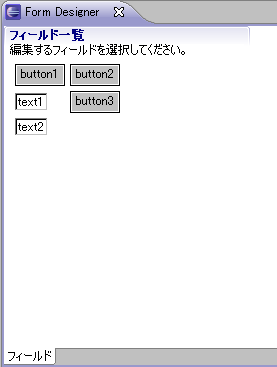
Master
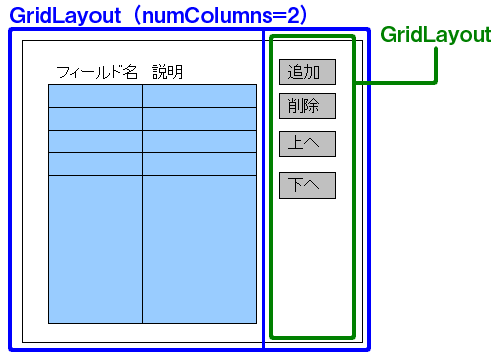
GridDataオブジェクトの設定
フィールド名 説明
exclude ウィジェットが保持するサイズと位置情報を無視するか
grabExcessHorizontalSpace ウィジェットが配置されるセルの幅を親コンポジットに合わせるか
grabExcessVerticalSpace ウィジェットが配置されるセルの高さを親コンポジットに合わせるか
minimumHeight ウィジェットが配置されるセルの最小の高さを指定する
minimumWidth ウィジェットが配置されるセルの最小の幅を指定する
horizontalAlignment セル内での水平方向の配置方法を決定する。設定は左寄せ
verticalAlignment セル内での垂直方向の配置方法を決定する。設定は左寄せ
horizontalIndent セルの左端からの水平方向のインデント位置を設定する
verticalIndent セルの上端からの垂直方向のインデント位置を設定する
horizontalSpan 水平方向に結合するセル数を指定する
verticalSpan 垂直方向に結合するセル数を指定する
heightHint ウィジェットの最適な高さを指定する
widthHint ウィジェットの最適な幅を指定する
protected void createMasterPart(
                IManagedForm managedForm,
                Composite parent) {
    ...

    Table table = toolkit.createTable(
                    composite,
                    SWT.SINGLE | SWT.FULL_SELECTION);
    table.setHeaderVisible(true);
    table.setLinesVisible(true);

    GridData layoutData = new GridData();
    layoutData.horizontalAlignment = GridData.FILL;
    layoutData.verticalAlignment = GridData.FILL;
    layoutData.grabExcessHorizontalSpace = true;
    layoutData.grabExcessVerticalSpace = true;
    table.setLayoutData(layoutData);

    TableColumn column1 = new TableColumn(table, SWT.NULL);
    ...
}
Fieldクラスの作成と一覧表示
public final class Field {
    private String fName;
    private String fDescription;
    private boolean fRequired;
    private String fMessage;

    public Field(final String name) {
        if (name == null) {
            throw new NullPointerException();
        }
        fName = name;
        fDescription = "";
        fRequired = false;
        fMessage = "";
    }

    public String getName() {
        return fName;
    }

    public void setName(final String name) {
        if (name == null) {
            throw new NullPointerException();
        }
        fName = name;
    }

    public String getDescription() {
        return fDescription;
    }

    public void setDescription(final String description) {
        if (description == null) {
            throw new NullPointerException();
        }
        fDescription = description;
    }

    public boolean isRequired() {
        return fRequired;
    }

    public void setRequired(final boolean required) {
        fRequired = required;
    }

    public String getMessage() {
        return fMessage;
    }

    public void setMessage(final String message) {
        if (fMessage == null) {
            throw new NullPointerException();
        }
        fMessage = message;
    }
}private class FieldsBlock extends MasterDetailsBlock {
@Override
protected void createMasterPart(
IManagedForm managedForm,
Composite parent) {
...
section.setClient(composite);
for (Field field : createSample()) {
TableItem item = new TableItem(table, SWT.NONE);
item.setText(0, field.getName());
item.setText(1, field.getDescription());
}
}
...
private List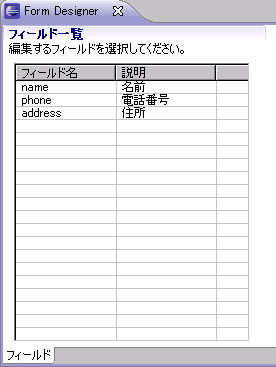
TableViewerクラスの導入


コンテンツプロバイダーとラベルプロバイダー
protected void createMasterPart(
                IManagedForm managedForm,
                Composite parent) {
    ...
    TableColumn column2 = new TableColumn(table, SWT.NULL);
    column2.setText("説明");
    column2.setWidth(100);

    TableViewer viewer = new TableViewer(table);
    viewer.setContentProvider(new ArrayContentProvider());
    viewer.setLabelProvider(new ITableLabelProvider() {
        public Image getColumnImage(Object element, int columnIndex) {
            return null;
        }

        public String getColumnText(Object element, int columnIndex) {
            if (element == null) {
                return "";
            }
            if (!(element instanceof Field)) {
                return "";
            }

            Field field = (Field) element;
            if (columnIndex == 0) {
                return field.getName();
            } else if (columnIndex == 1) {
                return field.getDescription();
            }
            return "";
        }

        public void addListener(ILabelProviderListener listener) {
        }

        public void dispose() {
        }

        public boolean isLabelProperty(Object element, String property) {
            return false;
        }

        public void removeListener(ILabelProviderListener listener) {
        }
    });

    section.setClient(composite);

    viewer.setInput(createSample());
}おわりに


