前回はJava SDKを使ってAmazon Elastic MapReduceを起動する方法を説明しました。今回は、
ここでは、
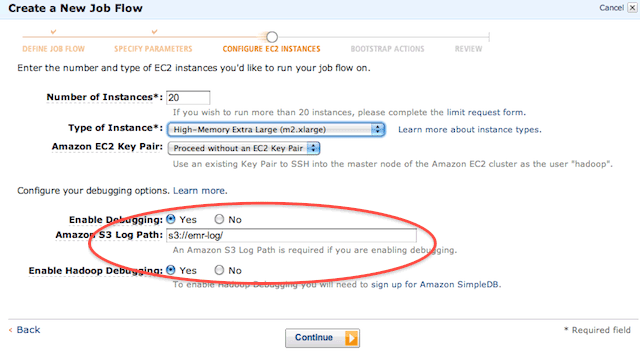
Web Consoleでデバッグモードを使用するには
Web Consoleでは、

まずは次の2点を設定してください。
- 「Enable Debugging」
をYesにする - 「Amazon S3 Log Path」
にログを保存したS3のパスを記入する
また
では、
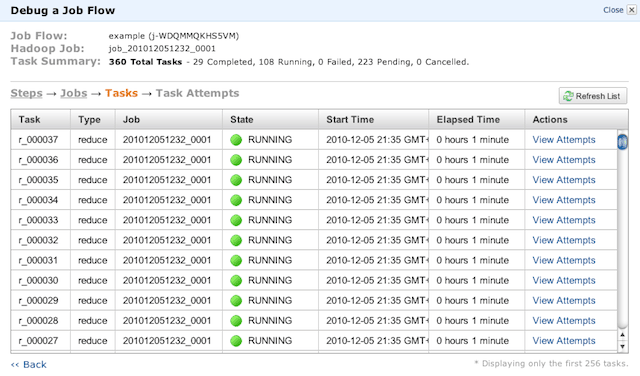
図2のように、

Debugをクリックすると、

「View Jobs」

この画面ではJobが1つ起動しているのがわかると思います。多段MapReduceなど、
それでは、

画面上部の
- Total Tasks
- →このJobで実行されるタスクの数
(ここでは360) - Completed
- →すでに終了しているタスク
(ここでは29) - Running
- →現在実行されているJobの数
(ここでは108) - Failed
- →失敗したタスク
(ここでは0) - Pending
- →現在の待ちタスクの数
(ここでは223) - Cancelled
- →キャンセルしたタスクの数
(ここでは0)
状態は
すべてのJobが終了し、

「Log Files」
- controller
- →このJobで使用した起動パラメータなどのログを確認することができます。
- stderr
- →このJobを実行中にエラーが発生した場合、
標準エラー出力に出力されるようになっているエラーはここに出力されます。Jobがエラーで終了する場合は、 このログを確認してみてください。 - stdout
- →stderr同様、
標準出力に出力されるようになっているエラーがここに出力されます。 - syslog
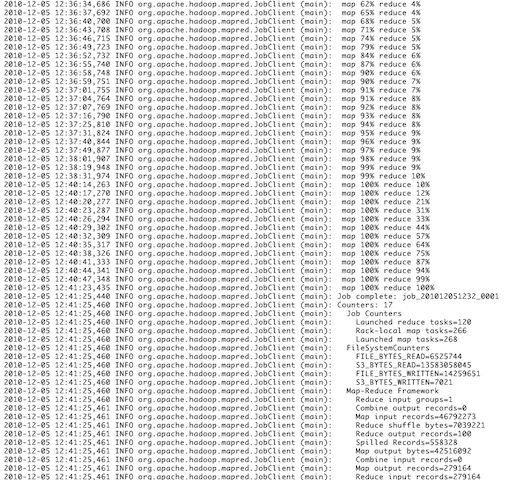
- →図7のように、
オンプレミスのHadoopでおなじみのログが出力されます。

Amazon Elastic MapReduce Ruby Clientでデバッグするには
次はAmazon Elastic MapReduce Ruby Clientを使ってデバッグする方法です。本連載の第3回もあわせて確認してみてください。コマンドはelastic-mapreduceを使います。
$ ./elastic-mapreduce --create \
 --name exsample \
 --master-instance-type m2.xlarge \
 --slave-instance-type m2.xlarge \
 --num-instance 20 \
 --jar s3://emrjar/examplejar \
 --args wordCount,s3://input/,s3://output
 --enable-debugging \
 --log-uri s3://emr-log/
ここで注目していただきたいのは、
- --enable-debugging
- --log-uri
--enable-debuggingでデバッグモードをオンし、
ちなみに、
Java SDKでデバッグするには
最後に、
まず、
今回はwithNameを"Debugging"としているので、
StepConfig enableDebugging =
    new StepConfig()
            .withName("Debugging")
            .withActionOnFailure("TERMINATE_JOB_FLOW")
            .withHadoopJarStep(new StepFactory().newEnableDebuggingStep());
次に、
RunJobFlowRequest runJobFlowRequest =
    new RunJobFlowRequest()
            .withName("EMR Job")
            .withSteps(enableDebugging, stepConfig)
            .withLogUri("s3://emr-log/")
            .withInstances(new JobFlowInstancesConfig()
                                    .withEc2KeyName("cluster-key")
                                    .withHadoopVersion("0.20")
                                    .withInstanceCount(10)
                                    .withKeepJobFlowAliveWhenNoSteps(true)
                                    .withMasterInstanceType("m1.large")
                                    .withSlaveInstanceType("m1.large")
                                    .withPlacement(new PlacementType()
                                                          .withAvailabilityZone("us-east-1a")));
ポイントは以下の2点です。
- RunJobFlowRequest#withSteps
- RunJobFlowRequest#withLogUri
RunJobFlowRequest#withStepsには、
RunJobFlowRequest#withLogUriは、
今まで同様、
以上、
最後に忘れてはいけないのがログの削除です。MapReduceを使ったことがある方はわかると思いますが、


