


前回までで、
Flow とは
ウェブアプリケーションでは、
しかし、
簡単な使用方法
まずは簡単な例をお見せします。
アプリケーションのディレクトリに hello.
<?php
require_once '__init__.php';
Rhaco::import('generic.Flow');
$flow = new Flow();
// greeting に "Hello!" をセット
$flow->setVariable('greeting', 'Hello!');
if(!$flow->isVariable('name')){
// name が与えられなかったら Guest をセット
$flow->setVariable('name', 'Guest');
}
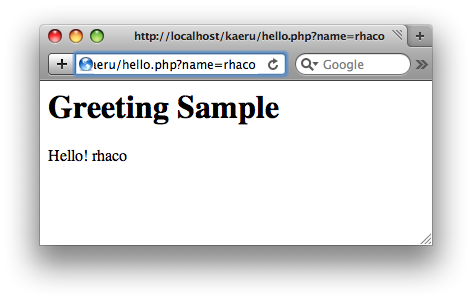
$flow->write('hello.html');ここでは、
最初の行の __
このコードでは、 http://
テンプレートファイルは、
ここでは、
<html><body>
<h1>Greeting Sample</h1>

{$greeting} {$name}

</body></html>
これは、
<?php
require_once '__init__.php';
Rhaco::import('network.http.Request');
Rhaco::import('tag.HtmlParser');

$request = new Request();
$parser = new HtmlParser();
// テンプレート変数 greeting に "Hello!" をセット
$parser->setVariable('greeting', 'Hello!');
$parser->setVariable('name', $request->getVariable('name', 'Guest'));
$parser->write('hello.html');
前述したコードと少し違う点にお気づきでしょうか?
getVariableメソッドに第二引数を渡すと、
それでは、
DBに接続をする
第3回の
アプリケーション内でDBに接続するには DbUtil
DB設定は projext.
テーブルモデルは、
<?php
require_once '__init__.php';
Rhaco::import('database.DbUtil');
Rhaco::import('model.Todo');

// DbUtil に、Todoモデルクラスの connection メソッドの返り値を渡す
$db = new DbUtil(Todo::connection());
これで、
一覧画面を出力してみる
Flow, DbUtil を組み合わせて、
次のようなコードになります。
<?php
require_once '__init__.php';
Rhaco::import('database.DbUtil');
Rhaco::import('model.Todo');
Rhaco::import('generic.Flow');

$db = new DbUtil(Todo::connection());
$flow = new Flow();
$flow->setVariable('object_list', $db->select(new Todo()));
$flow->write('list.html');
DbUtilのselectメソッドには、
DBの操作も、
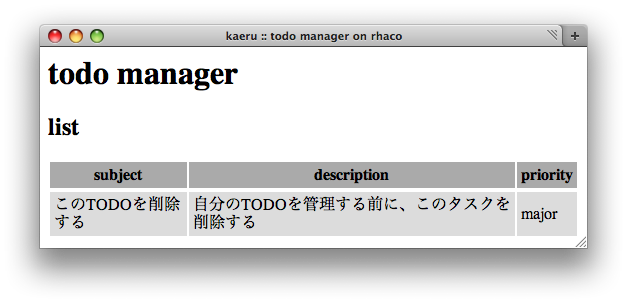
テンプレートは次のようなものになります。あまりにも殺風景だったので、
<html>
<head>
  <meta http-equiv="Content-Type" content="application/xhtml+xml; charset=utf-8" />
  <title>kaeru :: todo manager on rhaco</title>
  <style type="text/css">
    table#todo th, table#todo td {
      padding: .3em;
    }
    table#todo th {
      background: #aaa;
    }
    table#todo tr.odd {
      background: #dcdcdc;
    }
  </style>
</head>
<body>
  <h1>todo manager</h1>
  <h2>list</h2>

  <table id="todo" rt:param="object_list" rt:var="object">
    <tbody>
      <tr class="even">
        <td>{$object.subject}</td>
        <td>{$f.text2html($object.description)}</td>
        <td>{$object.captionPriority()}</td>
      </tr>
    </tbody>
    <thead>
      <tr>
        <th>subject</th>
        <th>description</th>
        <th>priority</th>
      </tr>
    </thead>
  </table>
</body>
</html>
今回使用したテンプレートの記法について解説します。
- rt:param, rt:var
ループさせたい table, ul, select の属性として指定します。param には変数名、
var にはループ内で用いる変数を設定します。 tableで利用する場合、
tbodyがあるとその内部についてのみループします。また、 class要素に “even” または “odd” を指定すると、 ループ内で even/ odd が交互に出力されます。 - {$f.
text2html()} テンプレートの予約変数 $f は、
tag. model. TemplateFormatter に存在します。 text2htmlメソッドは、
文字列をエスケープしたあと、 改行に <br /> を追加します。引数を設定すると文字数や行数の制限も可能です。
flow.
これで今回の目標達成です。お疲れ様でした。
管理画面から、
次回予定は、