


プロトコルやクライアントとサーバの動作を理解するには、
なお、
Chromeによる確認
Chrome、
ChromeのデベロッパーツールのNetworkペインでは、

Protocolのカラムで、h3-29と表示されています。正式なHTTP/h3と表示されるでしょう。
Curlによる確認
CLI
GitHubのCurlのリポジトリのページに、56edda7)47cefed)
# 次の行はRustのインストール
$ curl https://sh.rustup.rs -sSf|sh
$ git clone https://github.com/cloudflare/quiche \
  --recursive
$ cd quiche
$ cargo build --release \
  --features ffi,pkg-config-meta,qlog
$ mkdir deps/boringssl/src/lib
$ ln -vnf $(find target/release \
  -name libcrypto.a -o -name libssl.a)\
  deps/boringssl/src/lib/

// Curlのビルド
$ cd ..
$ git clone https://github.com/curl/curl
$ cd curl
$ ./buildconf
$ ./configure \
  LDFLAGS="-Wl,-rpath,$PWD/../quiche/target/release" \
  --with-ssl=$PWD/../quiche/deps/boringssl/src \
  --with-quiche=$PWD/../quiche/target/release
$ make

// HTTP/3通信
$ ./src/curl https://google.com --http3 -v
(省略)
* h3 [:method: GET]
* h3 [:path: /]
* h3 [:scheme: https]
* h3 [:authority: google.com]
* h3 [user-agent: curl/7.76.1-DEV]
* h3 [accept: */*]
* Using HTTP/3 Stream ID: 0 (easy handle 0x5570514cf2f0)
> GET / HTTP/3
> Host: google.com
> user-agent: curl/7.76.1-DEV
> accept: */*
 (省略)
補足情報:
Curlのビルド手順が更新されています。2022年6月現在の手順は次のとおりになります。
$ curl https://sh.rustup.rs -sSf|sh
$ git clone https://github.com/cloudflare/quiche \
 --recursive
$ cd quiche
$ cargo build --release \
 --features ffi,pkg-config-meta,qlog
$ mkdir deps/boringssl/src/lib
$ ln -vnf $(find target/release \
 -name libcrypto.a -o -name libssl.a)\
 deps/boringssl/src/lib/

$ cd ..
$ git clone https://github.com/curl/curl
$ cd curl
$ ./buildconf
$ ./configure \
 LDFLAGS="-Wl,-rpath,$PWD/../quiche/target/release" \
 --with-ssl=$PWD/../quiche/deps/boringssl/src \
 --with-quiche=$PWD/../quiche/target/release
$ make
なお、Curlのビルドの最新手順は公式であるHTTP3 (and QUIC)を参照してください。
Wiresharkによる確認
マシンで行われている通信のパケットをキャプチャし、
Wiresharkは、
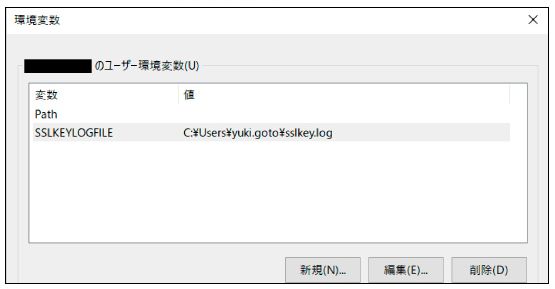
復号の準備
HTTP/
ここでは、SSLKEYLOGFILEを設定します。変数値はファイルの出力先パスです。Windowsの場合は、
$ SSLKEYLOGFILE=~/Desktop/sslkey.log "/Applications/Google Chrome.app/Contents/MacOS/Google Chrome"
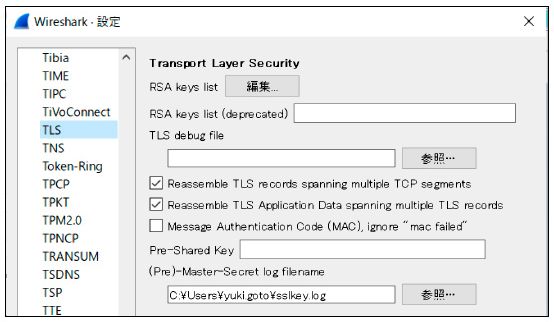
続けて、SSLKEYLOGFILEで設定したファイルを指定します
パケットキャプチャ
ここまで設定できたら、
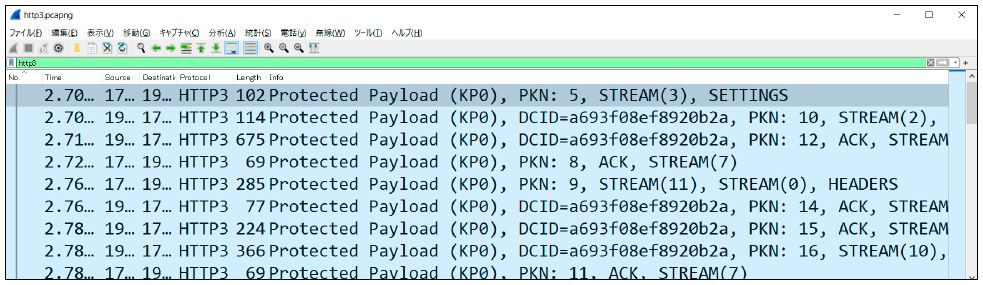
図4では、
図4上でパケットを選択することで、
qvisによるQUIC通信の可視化
本節では、
qlogは、
qlogで記録するには、
Curl通信の可視化
Curlでqlogを出力する場合、QLOGDIRを設定します。
$ QLOGDIR=./ ./src/curl  https://localhost --http3
(省略)
$ ls ./*.qlog
./01e6104c677b671c3d32f6a07c7080742e92ed89.qlog
これで、~.qlogというファイルが出力されます。このファイルをqvisで可視化します。
qvisは作者のWebサイト上でも使用できます。
https://

図5の上2つの矢印を例に見方を説明します。まず、
表示されている項目をクリックすると、

通信内容をアップロードしたくない場合は、
nginxサーバの構築
HTTP/
なお、
ビルド
nginxe6c26cb4d38b)
# 必要なパッケージのインストール
$ sudo apt install mercurial ninja-build \
  libpcre3 libpcre3-dev
$ git clone https://boringssl.googlesource.com/boringssl
$ cd ./boring/
$ mkdir build
$ cd build
$ cmake -GNinja ..
$ ninja
$ cd ../../

// nginxのビルド
$ hg clone -b quic https://hg.nginx.org/nginx-quic
$ cd nginx-quic
$ ./auto/configure \
  --with-debug --with-http_v3_module \
  --with-cc-opt="-I../boringssl/include" \
  --with-ld-opt="-L../boringssl/build/ssl \
  -L../boringssl/build/crypto" \
  --prefix=./
$ make
設定
nginxでHTTP/./に設定を追記します。
$ openssl genrsa 2048 > ./conf/server.key
$ openssl req -new -key ./conf/server.key \
  > ./conf/server.csr
$ openssl x509 -days 30 -req -signkey \
  ./conf/server.key < ./conf/server.csr \
  > ./conf/server.crt
http {
(省略)
# httpディレクティブ内に以下を追記
    server {
        listen 443 http3 reuseport;
        listen 443 ssl;

        ssl_certificate server.crt;
        ssl_certificate_key server.key;
        ssl_protocols TLSv1.3;

        location / {
            add_header Alt-Svc 'h3=":443"; ma=60, h3-29=":443"; ma=60, ';
        }
    }
# ここまで追記
}
なお、
動作確認
nginx-quicディレクトリに移動し、
$ sudo ./objs/nginx -c ./conf/nginx.conf
HTTP/
$ ./src/curl https://localhost --http3 -v
*   Trying 127.0.0.1:443...
* Connect socket 5 over QUIC to 127.0.0.1:443
* Sent QUIC client Initial, ALPN: h3-29,h3-28,h3-27
* Connected to localhost () port 443 (#0)
* h3 [:method: GET]
* h3 [:path: /]
* h3 [:scheme: https]
* h3 [:authority: localhost]
* h3 [user-agent: curl/7.76.1-DEV]
* h3 [accept: */*]
* Using HTTP/3 Stream ID: 0 (easy handle 0x559e232a62f0)
> GET / HTTP/3
> Host: localhost
> user-agent: curl/7.76.1-DEV
> accept: */*
>
< HTTP/3 404
< server: nginx/1.19.9
< date: Sun, 11 Apr 2021 17:29:12 GMT
< content-type: text/html
< content-length: 153
まとめ
本章では、