


今月の19日ぐらいにUbuntu 17.
GNOME ShellとJavaScript
今回のリリースはGNOME Shellを抜きにしても、
さてそんなGNOME Shellについて。これまで採用してきたUnityに対する最大のアドバンテージはその
GNOME Shellの拡張機能はJavaScriptとCSSで構成されています。つまりウェブ開発の経験があれば比較的かんたんに拡張機能を作成できるのです。実はGNOME Shell本体も、
ちなみにGNOME ShellではJavaScriptエンジンとして、
たとえばGNOME Shell上で

GNOME Shell Extension
さっそくGNOME Shellの拡張機能を作ってみましょう。今回はまだ開発版であるUbuntu 17.
GNOME Shellには拡張機能の管理コマンドであるgnome-shell-extension-tool」
適当なディレクトリで--create-extension」
$ gnome-shell-extension-tool --create-extension

Name should be a very short (ideally descriptive) string.
Examples are: "Click To Focus",  "Adblock", "Shell Window Shrinker".

Name: Sample

Description is a single-sentence explanation of what your extension does.
Examples are: "Make windows visible on click", "Block advertisement popups"
              "Animate windows shrinking on minimize"

Description: Sample Extension for Recipe

Uuid is a globally-unique identifier for your extension.
This should be in the format of an email address (foo.bar@extensions.example.com), but
need not be an actual email address, though it's a good idea to base the uuid on your
email address.  For example, if your email address is janedoe@example.com, you might
use an extension title clicktofocus@janedoe.example.com.
Uuid [Sample@ubuntu-ax2]: sample@mty.shibata.gmail.com
Created extension in '/home/shibata/.local/share/gnome-shell/extensions/sample@mty.shibata.gmail.com'
This tool has been deprecated, use 'gio open' instead.
See 'gio help open' for more info.
決めなければならない項目は次の3つです。
- 名前
(Name) - 概要
(Description) - UUID
名前と概要は自由に設定してください。UUIDはユニークなIDをつけますが、
設定が完了するとエディターが起動し、extension.」
- extension.
js - metadata.
json - stylesheet.
css
「extension.」metadata.」stylesheet.」
作成されたファイルはユーザー固有の拡張機能ディレクトリ~/.local/)
$ ls -la ~/.local/share/gnome-shell/extensions/sample@mty.shibata.gmail.com/
合計 20
drwxrwxr-x 2 shibata shibata 4096 10月  7 20:32 .
drwxrwxr-x 3 shibata shibata 4096 10月  7 20:32 ..
-rw-rw-r-- 1 shibata shibata 1468 10月  7 20:32 extension.js
-rw-rw-r-- 1 shibata shibata  133 10月  7 20:32 metadata.json
-rw-rw-r-- 1 shibata shibata  172 10月  7 20:32 stylesheet.css

$ cat ~/.local/share/gnome-shell/extensions/sample@mty.shibata.gmail.com/metadata.json
{"name": "Sample", "description": "Sample Extension for Recipe", "uuid": "sample@mty.shibata.gmail.com", "shell-version": ["3.26.1"]}

$ cat ~/.local/share/gnome-shell/extensions/sample@mty.shibata.gmail.com/stylesheet.css
.helloworld-label {
    font-size: 36px;
    font-weight: bold;
    color: #ffffff;
    background-color: rgba(10,10,10,0.7);
    border-radius: 5px;
    padding: .5em;
}
一般的にGNOME Shellの拡張機能をインストールしたときは、/usr/」
サンプル拡張機能の有効化
拡張機能をインストールしただけでは機能は有効になっていません。第490回でも説明しているように、
余計なものをインストールしたくないのであれば、gnome-shell-extension-prefs」
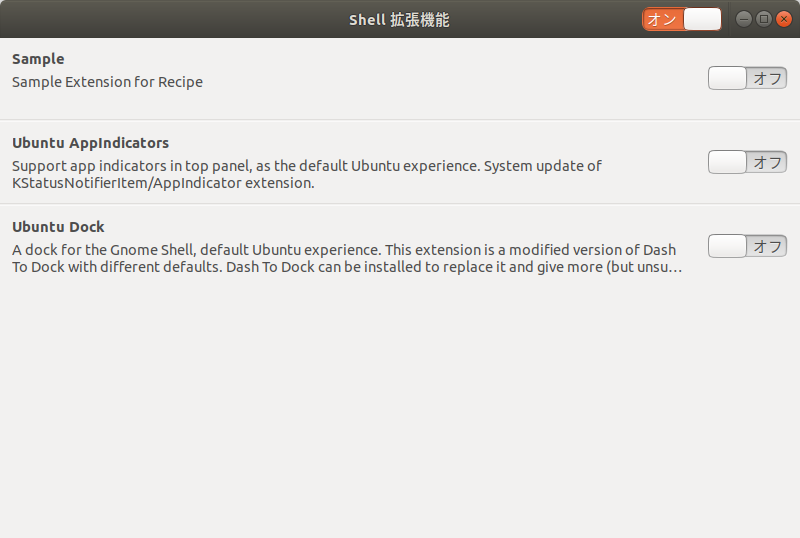
このコマンドはインストール済みの拡張機能をリストアップして個別に有効化・
よって有効化・
$ gsettings get org.gnome.shell enabled-extensions
['sample@mty.shibata.gmail.com']
環境によっては有効化前もしくは有効化後にGNOME Shellを再読込する必要があるようです。
サンプルの拡張機能が有効化されたら、
extension.jsの中身
拡張機能の本体であるextension.init()関数」enable()」disable()」
const St = imports.gi.St;
    const Main = imports.ui.main;
    const Tweener = imports.ui.tweener;

let text, button;ファイルの冒頭は必要な機能のインポートとグローバル変数の設定です。Stは
textやbuttonはこのサンプル拡張機能で使用しているブロックスコープの変数です。
先にinit()の中を見てみましょう。前述したとおり、Mainオブジェクトに対する変更)
今回のサンプルではトップパネルに表示するボタン
function init() {
    /*
     * トップパネルに表示するボタン(UIコンテナー)を作成し、
     * プロパティを設定しています。
     *
     *   style_class: スタイルシートのクラス名
     *   reactive: マウス操作などに応答するかどうか
     *   can_focus: キーボード操作によるフォーカスが合うかどうか
     *   x_fill/y_fill: 子要素がx/y方向それぞれに親要素にあわせて
     *                  サイズ調整されるかどうか
     *   track_hover: マウスカーソルでhoverステートになるかどうか
     *
     * 今回はボタンとして使うため、reactiveをtrueにしています。
     */
    button = new St.Bin({ style_class: 'panel-button',
                          reactive: true,
                          can_focus: true,
                          x_fill: true,
                          y_fill: false,
                          track_hover: true });

    /*
     * アイコンを作成しています。
     *
     * "system-run-symbolic"はシステムに最初から入っているアイコン名です。
     * /usr/share/icons/Adwaita/scalable/actions/system-run-symbolic.svg
     */
    let icon = new St.Icon({ icon_name: 'system-run-symbolic',
                             style_class: 'system-status-icon' });

    /*
     * buttonの子要素として先ほど作成したアイコンを設定しています。
     */
    button.set_child(icon);

    /*
     * button-press-eventで応答するハンドラーとして
     * _showHello()を設定しています。
     *
     * サポートしているシグナルは以下のURLで確認できます。
     * https://developer.gnome.org/clutter/stable/ClutterActor.html#ClutterActor.signals
     */
    button.connect('button-press-event', _showHello);
}init()以外に必須の関数が、enable()とdisable()です。
function enable() {
    /* ボタンをトップパネルの右側に追加します。
     *
     * トップパネルは右端の_leftBox、_centerBox、_rightBoxの
     * 3つのコンテナーが存在します。
     *   _leftBox: 左端のアクティビティやカレントタスクを表示している領域
     *   _centerBOx: 中央の日時を表示している領域
     *   _rightBox: 右端のインジケーター領域
     * Looking Glassで「Main.panel._rightBox」を実行すれば
     * どれがどこかわかりやすいでしょう。
     *
     * 今回は_rightBoxにbuttonを追加しています。
     * 第二引数で追加順が最初か末尾かを変更できます。
     */
    Main.panel._rightBox.insert_child_at_index(button, 0);
}

function disable() {
    /* 無効化時にトップパネルからボタンを削除します。 */
    Main.panel._rightBox.remove_child(button);
}
ここまででボタンの作成、
今回のハンドラーは、
function _hideHello() {
/*
* Mainオブジェクトから、_showHello()が追加した
* ラベルオブジェクトを削除します。
*/
Main.uiGroup.remove_actor(text);
text = null;
}
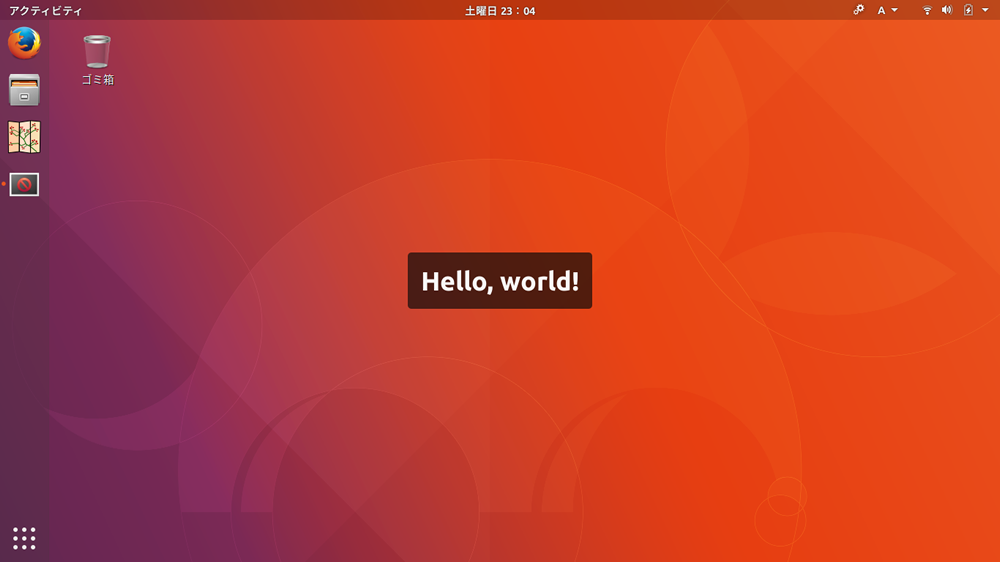
function _showHello() {
/*
* ディスプレイ中央に表示するラベルオブジェクトを作成します。
*
* style_classに指定してるhelloworld-labelクラスは、
* stylesheet.cssで設定しています。
* つまりこのCSSファイルを変更するだけで
* ラベルの見た目を変更できるわけです。
*
* textに表示するテキストを設定し、Mainオブジェクトに追加しています。
*/
if (!text) {
text = new St.Label({ style_class: 'helloworld-label', text: "Hello, world!" });
Main.uiGroup.add_actor(text);
}
/* ラベルオブジェクトを不透明に設定しています。 */
text.opacity = 255;
/* プライマリーモニターのインスタンスを探しています。 */
let monitor = Main.layoutManager.primaryMonitor;
/* ラベルの表示位置を、プライマリーモニターの中央に設定しています。 */
text.set_position(monitor.x + Math.floor(monitor.width / 2 - text.width / 2),
monitor.y + Math.floor(monitor.height / 2 - text.height / 2));
/*
* Tweenerを用いてラベルオブジェクトのアニメーションを設定しています。
*
* 2秒(time)かけて不透明度(opacity)を0(透明)にしています。
* opacityの変化の方法はeaseOutQuadを指定しています。
* 参考: http://hosted.zeh.com.br/tweener/docs/en-us/misc/transitions.html
* 変化が完了したら_hideHello()を呼び出し、
* ラベルオブジェクトを削除します。
*/
Tweener.addTween(text,
{ opacity: 0,
time: 2,
transition: 'easeOutQuad',
onComplete: _hideHello });
}これがサンプルコードのすべてです。
拡張機能のデバッグ方法
拡張機能の中でもlog()関数を使ってデバッグログを記録できます。これがどこに出力されるかと言うと、journalctlコマンドを使えば特定のプロセスのログを取得できます。よって次のコマンドを実行するとGNOME Shell本体のログを表示できることでしょう。
$ journalctl /usr/bin/gnome-shell -f
「-f」-f」
標準設定だとページャーとしてlessを使うのですが、-S」
単に右端で折り返したいなら、
単に出力をlessに渡す(カラーコードなどは設定されなくなる)
$ journalctl /usr/bin/gnome-shell --no-pager | less

lessのオプションを変更する(一部カラーコードが表示されない)
$ SYSTEMD_LESS="FRMXK" journalctl /usr/bin/gnome-shell

別のページャーを使う
$ SYSTEMD_PAGER=foo journalctl /usr/bin/gnome-shell
好みに合わせて選択すると良いでしょう。
Looking Glassを開いて、